A little over two years ago (August 2010) I made a bold little piece called With All My Heart
 |
| The original necklace |
This was originally meant to be a
one-of-a-kind piece, but in late July of this past year someone left me a
comment on this post:
“How do I order this key to my heart jewelry? I am in afghanistan and would love to get it for my girl at home.”
It was actually a few months before I saw the comment. I’m supposed to be able to moderate comments, so they don’t post until I see them, and I should get an email telling me I have comments to moderate. But not this time. Not sure what happened, but I contacted the guy, whose name is Jon, apologized for the delay and asked if he was still interested. As it happened, he was!
“It is beautiful and (we) have that
special "Key to my Heart" relationship so this piece is very fitting
and she will love it. I wish I could use the key she gave me in a gift but I
believe we will gain quite the key collection in time :)”
I had sold the original piece at Mare's Wares Arts Fest in July of 2011, but told him I had all the materials and could make
another. So we discussed payment, shipment, delivery, etc. As it was to be a
Christmas present, I only just shipped it. But THIS time, I photographed the
process along the way.
I don’t know if he’d be interested in the
process, but I find myself interested in explaining it. At art shows, which are supposed to be (though aren't always) filled with vendors who hand craft their products, I still get the
occasional browser in my booth who'll ask “did you make all this?”, which only serves to make me
wanna grab ‘em by the collar, pull ‘em in close, and explain how each and every
piece on display is made. OK, maybe not. Well, I might think it, but I would never actually follow
through (grin). This piece took me a little longer to complete than it might have because of a few
complications, so I thought I’d
take a few shots along the way.
 | |
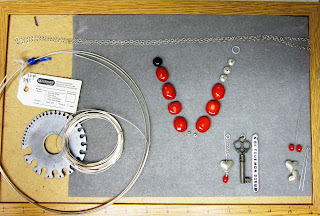
| Most of the components assembled on a cork board work space. |
 | |
| Chain, hook clasp & small components |
After I had everything assembled, I began patinating individual silver pieces. I never used to like using liver of sulfur. I always preferred bright and shiny silver to artificially blackened pieces. But blackening, and then cleaning, the silver really does add visual interest. And in the case of the De Tout Mon Coeur tag, it was necessary to make the letters really pop and more easy to see.
 |
| The letters in the fine silver tag really pop after a dip in LOS! |
There are times when I can dip an entire finished piece into warm liver of sulfur, but I didn't want to do that with this piece; I had more control over the components by dipping and cleaning them individually. And the little puffy Thai silver hearts had already been patinated a bit, so I didn't want to have to clean them off again.
 |
| Completed pendant, ready to string |
 |
| Partially assembled |
The portion of the piece connected to the chain is strung on Soft Flex beading wire. This is 49 strands of fine nylon coated stainless steel. It comes in multiple strengths and I used the .024 diameter "heavy" type, because it's a relatively hefty piece and I wanted it to hold up over time. Generally when I use beading wire on a piece, I end it with bead tips, tiny little bead cups with hooks. The cups hold the knot (yes, this stuff can be knotted), and the hook allows the strung piece to be connected to a clasp. On this piece, however, a bead tip wasn't going to work.
.JPG) |
| Beading wire through a crimp bead |
 |
| The 1st crimp creates two channels |
 |
| Almost done! |
 |
| The finished piece! |
I made some matching earrings, too .. they weren't part of the order, but I had a couple set backs (I had originally promised delivery mid-November) and Jon was so wonderfully patient and understanding that I included them as a concession to his patience.
Plus, if she's not in the mood to wear the larger, bolder piece, she can still wear the earrings and remember both the gift, the giver .. and that she's loved!
It's hard not to love commissions like this!


![[Most Recent Quotes from www.kitco.com]](http://www.kitconet.com/charts/metals/silver/t24_ag_en_usoz_2.gif)