Monday, March 29, 2010

A Positive Spin

I've been out of commission for several weeks due to a repetitive strain injury in my right hand/wrist. It just amazes me whenever I do something like this to discover just how much we use a particular muscle or body part! The problem was caused by a little too much laptop data entry .. it seems I overworked the joint in my right thumb, which created a little swelling in my wrist, just below the thumb pad. I feel like I've gotten a rather painful anatomy lesson. It's difficult enough turning the ignition key in my car, or shifting, or washing dishes, or opening a jar, or dressing, or putting on a jacket, or brushing or drying my hair .. making jewelry was out of the question.

However, after cleaning up portions of my studio - which could be done without hurting myself and was sorely needed - it was tough not to develop a whole bunch of ideas while putting away wire and pearls and stones and findings and stuff. It was an idea from an artisan friend though that finally had me thinking about what I might pull together, despite my (hopefully) temporary incapacity.

The idea was a donation .. she and I and several other friends are part of an artisan group covering three local counties (check out the link to the Adirondack Artisans Guild over on the right). My friend's daughter is coordinating a fund raiser at the school where she works in California and suggested that our group might open ourselves up to a whole new market if we were to donate as a group. I'd totally forgotten about it until the last minute, so didn't have a whole lot of time .. plus I couldn't pull together the sort of wrist wrenching wire work I would have liked to have created for what I saw as an opportunity to advertise along with my tax deductible contribution. I always think of California as ahead of the curve in style and accessories .. I wanted something a bit different and eye-catching.

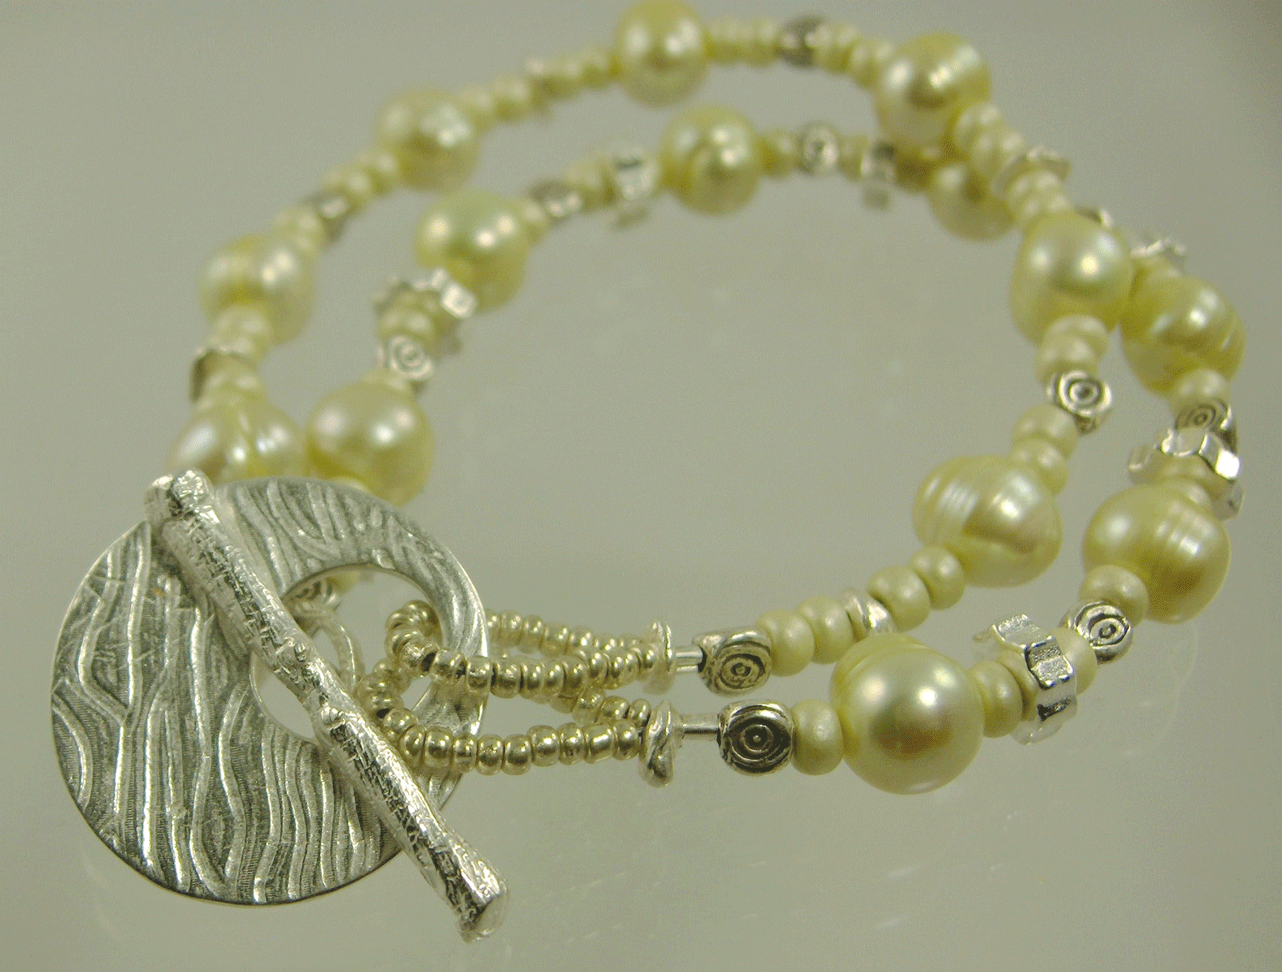
So .. I pulled out one of my funky fine silver toggle clasps .. this one is about 8 grams of pure silver and is textured on both sides, as you can see from the photos here (one side is a sort of checkerboard, the other is a wavy pattern). I might have normally fused some smaller fine silver rings to both ends and attached something with stones and silver beads and more fine silver connectors. But I thought that stringing a bracelet would be less stress on my wrist, which turned out to be the case. The clasp is about an inch across though .. a single strand, unless relatively large beads were used, would be overwhelmed by the large clasp.

Add Image
I spent an entire day working out the design, color scheme and additional beads to be used before I finally began to assemble it. It was seasonably warm and sunny last week when I put it all together .. mid 40's, which is seasonable for this time of year in northern New York! I had initially chosen some peacock blue pearls .. they looked fabulous with the silver accents, but it was so dark. So I went rummaging through my pearl drawers and found these pretty, bright, and very Spring-like Celadon-colored fresh water pearls. And as it happened, I had some similarly colored 6/0 Czech glass beads to fill in the strands. I originally tried to use them to make the bead loops attaching the ring portion of the clasp to the strand, but they turned out to be just a tad too big. It was difficult to get the bar part of the toggle to fit through the hole when the 6/0 beads were taking up so much space inside. Fortunately, I found some smaller seed beads that fit the bill .. both in size and color. The rest of the strand is comprised of little three-sided Thai silver beads, some tiny little fine silver nuggets I made, and some very cool "gear" shaped beads made of silver-coated ceramic.

I have to tell you, it's been a LONG time since I've used crimp beads in a piece. I spent a good half hour looking for both crimp beads and the special tool one needs to attach them to a strand. All of my strung pieces use either beads tips or French wire to attach a beaded strand to a clasp .. but I couldn't figure out a way to attractively do it. The problem with crimp beads is that if you crimp a little too enthusiastically, you'll destroy and weaken the integrity of the wire inside the crimp bead; if you don't crimp firmly enough, the wire will ultimately work its way out of the crimp bead and all your beads will slide off and disappear.

I was delighted both by my ability to still be able to crimp properly AND with the design and look of the bracelet when it was done! It's very bright and Springy .. I called it Spring Fling. Hey, I was on the clock .. it was the first thing that popped into my head. It'll do : )

The event is scheduled for May 1 and is called Moroccan Nights: An Evening in Casablanca .. and doesn't THAT just conjure up a whole bunch of wonderful images in your mind .. dark, smoky jazz clubs, slinky gowns and swept up do's, mysterious strangers ... Bogey?!?! The paperwork suggested that ALL items will be put online for bidding unless the donor requests otherwise .. and why would anyone request otherwise?? The school is www.vistamarschool.org .. and I'm assuming there'll be a link somewhere on their site to the silent auction items once they have them all in their possession. I'll certainly keep you posted! : )

UPDATE: The link for the online auction portion of this event is up for viewing. Though bidding isn't possible until April 13, you can still scroll through what they've put up so far. I'm told there's a whole lot more to come. The site may be found here. If the link doesn't work, just copy and paste this: http://www.biddingforgood.com/auction/AuctionHome.action?vhost=vistamarschool

Monday, March 1, 2010

Sweetheart Pin with pearls


This large and fabulous pin design has taken on a life of its own. It began with a project by Sherilyn Miller from one of the many jewelry magazines to which I subscribe. I made the pin exactly as the project described, and even sold a few - which hadn't been my intention. I usually view projects like this as a chance to stretch my skills .. you make the project and hope that what you've learned spurs you on to other things. Even better, this one project has been the springboard for more variations than any other design project I've ever tried. From this simple pin design I came up with a beautiful bracelet idea .. called Tranquility (though I called the one I gave my friend for her April birthday April Showers). I did so incredibly well with those bracelets - which varied slightly in size and stones, though remained always a soft shade of blue - that I'm working on trying another color scheme for it this year. It was the pin's most recent transformation that made me think that pearls and crystals might be the way to go.

I might have ultimately come up with the pearl idea on my own, but it was a potential customer who saw at a small show in Watertown a similar pin I made for a friend of mine (who was wearing it at the time). It was the same size as this pin (I have made a smaller, more delicate version, but neglected to photograph it before someone purchased it) but was covered in three different stones representing the birthstones for my friend, her husband and their son. I explained to her what the stones on my friend's pin represented and she asked if I could do one in jewel tones. Not a problem, I told her. But after subsequent back and forth emails with multiple scans of various stones and crystals, she asked if pearls and crystals would work. Even better, I thought. Clean, simple, romantic .. with just a little sparkle.

I was pleased with the finished pin .. about five or six of the crystals are small, 4mm round, clear crystals with an AB (aurora borealis) coating on them. It adds just a little flash of color without going over board (though no matter how many shots I took, I couldn't get that little flash of color to show in a photo). I've got several drawers full of white and cream pearls, so I was able to create a pleasing mix of different sizes and shapes.

For the moment though .. it's 2009 year-end and taxes that are scrambling the synapses in my cranium .. so the creative side of my brain is taking a break while the analytical side takes over. And that, my friends, is where the trouble usually begins ...

Stay tuned!

Sunday, February 7, 2010

It began with a bead ..

.. in the spring of 2009. The bead belonged to my potter friend, Mary Ann Evans. I had been showing off a bracelet I'd made which contained an old African trade bead, and she pulled out this large, colorful bead to show to me. It's about an inch and a half long and a half inch wide and appears to be a glass millefiori trade bead.

Beads similar to this can be traced to ancient Rome, Phoenicia and Alexandria. Archaeological sites in Ireland uncovered canes dating to the 8th century that were probably made in Venice. Prior to the 15th century, glass makers were only producing beads from Rosetta canes. Like Chevrons, Rosetta beads were made by adding a number of layers of colored glass in a mold and then pulling it from either end into a long cane. The cane was then cut into short segments.

Large scale Millefiori bead production began in the late 1800's. Beads were made by hand, one by one, built on a center glass core with solid color. Thin slices of colorful Rosetta cane were then pressed into the surface of the wound glass while still hot. Millefiori became one of the most commonly traded and popular beads. My friend's bead looked to be of a similar type .. singularly handmade. The glass core is black; and you can see two entirely different Millefiori slices were pressed onto the core. Here's a link to some similar examples: Millefiori trade beads

She handed the bead to me and said "See what you can do with it." So .. I took it. And it sat inside a little zip lock bag on an area of my work bench where I could see it pretty much any time I was working. She had suggested "a pendant or something" .. but it kept whispering bracelet to me.

Things were pretty crazy between June and November last year; but I think an idea began percolating almost immediately. Since the bead was so large, the piece had to be on an equal scale. But I didn't want it to be big and bulky, since the few things of mine Mary Ann owns are rather delicate. However, after discovering her wrist size was a nice average 6.5", I felt she could carry off what I had in mind.

What I ended up doing was making it entirely out of fine silver links .. in a gauge heavy enough to allow for some attractive hammering and forging without the weight. The five links attached to the hook mimic the design splotches on the bead, and the mother of pearl and blue sponge coral beads pick up a couple of the dominant colors. Despite the heft of the trade bead, the bracelet is very light weight.

The larger of the links contains wrapped 2.5mm mother of pearl beads on fine silver wire.

I've already given Mary Ann the bracelet or I would have taken another shot of this link .. there's actually a front and a back to the bead, and this, much to my dismay, is the back. The wire extending up to the bead isn't as prominent in the front. It still looks good, but I'm sorry I didn't notice that when I was taking the photos.

As I've mentioned in previous posts about pieces containing fine silver, one can "harden" fine silver by giving it a good going over with a hammer. This changes the composition of the metal's crystals in such a way that a very malleable piece of wire becomes very rigid. It would be difficult to bend several of these links without a bit of effort. Because fine silver IS so soft, however, it's easy after flattening and hardening a link to add a little surface design interest with whatever might be at hand .. in this case, the smaller ends of several different types of hammers in my arsenal. It's a funky piece, to be sure; and I like it enough to maybe try a similar design with a slightly different focal bead. I have a whole lot of them from which to choose, so we'll see what kind of interesting pieces I can get out of this idea. This particular piece I called Manic Millefiori.

Might be time to purchase some more fine silver wire!

Thursday, December 10, 2009

Prolific Progeny

I used to do "Progeny" bracelets all the time about six or seven years ago .. the kind with the little square sterling letters that spell out the names of the recipient's children or grandchildren. I still have some of those little letters, though I haven't used them in quite a while .. and they certainly would not have worked for this commission, which needed to represent 17 grandchildren! I doubt the recipient has a wrist sturdy (or long) enough to endure the weight of 17 little sterling names! But then, there are always birthstones ..

What I like about this style of bracelet .. a one-of-a-kind special order using stones instead of names .. is that it's so very much more personal and private. Someone could look at this piece and have no idea that each and every stone represents a special little person. There are no doubt some women who would prefer the conversation-starting style of a bracelet with several names on it .. other women know what those names are and are bound to ask. And some women would love nothing more than to relate the glowing and talented natures of each and every name on her bracelet. This design allows for more subtlety .. someone might see it and comment on it; the recipient is then able to either simply express thanks for the comment (a positive comment, I hope) or go on to explain what the stones represent. I like the mystery of it. Some women like to keep a few special things to themselves .. or not. And sometimes it just depends on the moment.

I will admit that 17 birthstones seemed a bit daunting at first; but I think I came up with a design that is not only balanced, but doesn't even seem like it contains 17 stones at first glance. I have a "Modern" list of birthstones posted in my studio, and it's this list that I use when anyone wants to talk about making a piece like this. I made myself nuts hunting up a list I could use .. there are so many different versions. I finally just found one that seemed to contain most of the recognized standards. This particular list contains alternative stones for several months, which turned out to be useful for this design, as I was able to use one of each for months that represented more than one child. The 17 stones used for this piece are as follows:

4 Jan (garnet)
2 Feb (amethyst)
2 Mar (aquamarine)
2 May (emerald)
2 Jun (pearl, moonstone)
1 Sep (sapphire)
2 Oct (opal, pink tourmaline)
1 Nov (topaz, citrine)
1 Dec (blue topaz, turquoise)

The only segments of the bracelet that use sterling silver are the lobster clasp, the wire used to wrap the small dangling briolettes, and the half hard wire I used to connect loose stones to each other or other segments in the bracelet. Everything else .. the CHERISH and heart charms, the large patterned rings, the smaller jump rings, and the ball-end headpins .. are all hand made and work hardened by me from fine silver. I would have liked to have made the entire thing from fine silver, but I couldn't work harden the wire I used to connect segments without mangling it. Even drawing the wire through a draw plate didn't harden it to my satisfaction (not enough to hold up under heavy wear, which these kinds of bracelets tend to get) .. so I compromised a little.

The photo above shows the little heart charm and a fine silver extension chain to which is attached a small fresh water pearl disk, a peach moonstone, and a faceted lemon citrine briolette.

Once I started thinking about it, I was able to come up with a design idea relatively quickly - though it ended up taking me five .. almost six .. months to complete (it was intended either for the recipient's birthday on November 30 - missed that one due to my anal retentive, gotta get it right, attitude - or Christmas). I would lay out some stones, but would keep coming up with new configurations. Then I'd be unhappy with the stone selection I had for the few more precious versions that were included: I had sapphires, emeralds and blue topaz, but they were all very small and wouldn't have stood out as a part of the piece the way I had wanted them to. Fortunately, I found a fabulous new supplier from whom I could purchase precious stones in small quantities (most stones and pearls come on 16" temporarily strung strands .. more spectacularly cut stones or specimens come on 8" strands or are sold by weight). This made all the difference! A full 16" strand of emeralds, sapphires or blue topaz like those used in this piece would have been hundreds of dollars. It took me a while to find all the replacement stones I wanted .. but it was worth the wait.

The pink stone on the left is actually an opal .. not the usual Australian type but rather a pink Peruvian variety (Peru has blue opals, too, but they're much more rare). I did finally find some traditional Australian opals .. but even though the strands were a bit costly, I was so very disappointed in their quality when I received them, I couldn't possibly have used them in this piece. The pale blue stone on top is an aquamarine. Since there were so many garnets, I used the smallest ones I had. They hang on either side of a sapphire on the left and a Swiss blue topaz on the right (and isn't that a pretty stone!?!)

There's the second aquamarine on the left, two beautiful amethysts on the right, and two emeralds and a little pink tourmaline hiding behind them in the center. The large ring from which they dangle is made of fine silver (that's .999, or as close to pure as you can get) and is patterned on both sides. Adding the two patterned rings allowed me to add those smaller stones without taking up any length on the bracelet.

The CHERISH charm was an after thought .. I knew I wanted to add a charm like that somewhere on the piece, but I wasn't sure what I wanted it to say, where I was going to put it, or how big or what shape I wanted it to be.

It wasn't until I began to assemble the pieces that I got a better idea of what I wanted and how it would fit in. I knew what size the bracelet needed to be and had to lose a larger coin-shaped fresh water pearl in order to use the rectangular charm. I ended up putting a smaller coin pearl on the extension chain .. and was thrilled that it ended up balancing well with the little disk-shaped peach moonstone! I love it when it all works out!

I call this one .. what else .. Cherish. Just in time for Christmas, too. Whew!

Friday, October 23, 2009

A little sunshine on this dreary day ..

I don't make nearly enough pieces in gold, but when I do they're nearly always eye catching. Not that my sterling and fine silver pieces aren't eye catching as well, there's just something so sunny and bright about this metal! I call this one Southwest Summer .. it just oozes the colors of sage, adobe and dry heat - with a few fluffy white clouds and a blindingly bright orange ball in the sky.

This burst of color is one of the things I love about lampwork glass beads .. that and the infinite creativity the artisans who make them seem to harbor in their bosoms. It's difficult not to feel a sense of fun in a piece full of lampwork beads!

While I have several pieces that are solid metal, I think I will always include pieces that speak to me of a place or an emotion or a time which can be expressed with color. Some color combinations are like a song .. or a smell .. that invoke a wealth of thoughts or memories. A sort of sensory placeholder that just sort of pops up when the right combo is put in place. These memories or thoughts most often reveal themselves in the names I choose to give my pieces .. some are obvious, others not so much.

This one seems rather obvious, doesn't it? Despite the fact that the design is based on a similar silver version called Twilight .. which used pale blue/violet color- changing lampwork glass beads .. Southwest Summer seems to fit the piece well. And if I hadn't told you of the design similarities, you might never had made the connection.

OK .. I'm off to begin piecing together a commission for a grandmother's bracelet containing natural stones representing 17 grandchildren! While I've got a basic idea of the design features, I've yet to lay out the individual stones and decide what goes where just yet. And I'm thinking I'd like to make as much of it as I can out of fine rather than sterling silver, which will require a bit more care in keeping connecting pieces sturdy. Stay tuned ..

Sunday, October 18, 2009

A Good Day Was Had!

I have no idea how I missed logging and photographing one of my higher-end pieces, but I did. And thankfully, when the customer who bought it wanted it reproduced in another stone, she was willing to give it up for a few days so I could log the materials used and photograph it for my records. It must have just been one of those crazy weeks when I was multitasking beyond my abilities. It happens.

The necklace in question is called Emerald Isle and is composed of a faceted, graduated strand of emeralds separated at intervals with 18k and 22k gold beads and ending in a handcrafted 14k wire clasp. One of those simple but elegant little pieces. She bought it back on July 1 during the Mare's Wares Art Fest up here in Morristown; but she came to the Studio Tour our River Artisans put on in mid-August and asked if I could make another using the same gold beads but with a strand of aquamarine in place of the emeralds. I ordered several strands of aquamarine and found one out of those that fit the bill .. a very pretty 5mm faceted strand (the only graduated strand I could find began with a rather large 7mm center bead .. a bit too large).

The only change I made was in the clasp .. the emerald necklace originally had an 18k gold hook clasp which I replaced with the 14k gold wire one I made. I explained to the customer that I still had the 18k gold clasp; and as the aquamarine necklace was a gift for her daughter's 40th birthday, she was fine with using the 18k clasp instead of a handcrafted 14k clasp on the piece.

My only complaint about the whole thing was that neither necklace was easy to photograph .. or maybe I've just been away from my camera too long! I finally succumbed to my old routine of flat bed scanning the pieces .. though the true color of the two was still illusive, one of the things I have always liked about flat bed scanning jewelry is that there's little concern about clarity or fuzzy shots. The pieces are always pretty clear .. even if the colors aren't ; )

I have to admit, I was a little iffy about combining a pale aquamarine stone with gold .. the customer's daughter had expressed an interest in her mother's emerald necklace, which is where the idea came to purchase one for her daughter in her March birthstone. When I delivered the two necklaces on the 16th, even SHE thought she might not like the result; but in the bright light coming through the windows, it sparkled like sunlight on water. It really was a lot prettier than I would have imagined. She was equally pleased. I love it when it all works out!

Of the two photos of the aquamarine necklace shown here, the one on the display device is closer to the true, pale shade of aquamarine. Though I think the scan is a bit sharper, and allows a better look at the clasp. It's nothing special .. there's a little Bali granulation at the base of the hook .. but in 18k gold, it was about 45% of the total cost of the piece. Invest in gold, folks!

It's funny, but I've been on a sort of familia hiatus for the past couple of months .. helping out with issues revolving around family members .. and haven't been actively selling or doing any shows during this time. Then all of a sudden I sell two high-end aquamarine necklaces in one day! A nice surprise .. much needed and appreciated.


I sold the second necklace .. a longer, 21" faceted strand hand knotted on silk with a pretty little Bali toggle clasp .. to my mom's tenant! Go figure. He's a full-blooded Italian from my mom's old "Italian flats" neighborhood in Watertown and has been occasionally surprising her with lasagna, stuffed shells, and other gustatory delights on weekends when he has time to cook. It just happened that I was staying with her last weekend when he brought over enough for everyone. We got into a gab fest and after a bit the jewelry topic came up .. I had some fun pieces with me (including the emerald necklace which I had just picked up from the customer on the way down to my mom's). I think he told me he needed something for his ex .. who's birthday is October 22nd. What a guy, huh? So when I had to drive back down on the 16th, I brought the hand knotted aquamarine with me for my mom to show him that night. He called later that evening expressing amazement at my talent (I love those calls) and asking how much he needed to leave with my mom for the piece. He also expressed an interest in the solid silver necklace from a couple posts ago for a drum playing nephew named Sam. I'm still a little attached to that one .. but not so attached that I wouldn't sell it! Ah, who knows .. perhaps it was just the several bottles of beer talking .. dunno. I'm not a high pressure kind of sales person, so I'll just wait and see if the topic comes up again .. stay tuned!

Monday, August 31, 2009

Justice at the Museum

My husband, Ed - the Executive Director of the Frederic Remington Art Museum here in Ogdensburg - went in to work today expecting a special visitor and wasn't disappointed. He was able to sit next to Sandra Day O'Connor during a luncheon at the museum prior to the curator, Laura Foster, whipping off the group with whom she arrived for a cook's tour of the galleries.

Being the tactful, sensitive and thoughtful guy he is, he asked her all about her .. how she felt about being the first woman appointed to the court, and the fact that women still make up such a small percentage of it, etc. What a treat! He called me once they were all in Laura's capable hands to tell me all about it. A brief brush with history .. and a photo to commemorate the occasion. Doesn't she look great!

Sunday, August 30, 2009

A year in the making

Someone more experienced than I in the field of jewelry making once told me that in response to a customer asking how long it took to make a particular piece offered for sale she will tell them "about 30 years and a couple hours" .. because, of course, so many casual shoppers fail to think about the total amount of experience involved in making any piece when they ask a question like that. There is a flip side, of course .. the customer who oooohs and ahhhs over even the silliest little piece of frivolity (we love those customers .. especially when they're loud and vocal). But, it's the "how long" question I get more often than not; though in fairness, it's often in awe of a particular piece that the question comes about. But still, I think I may incorporate my jewelry acquaintance's response into my own response repertoire when dealing with that inquiry in the future.

And with regard to the fine silver necklace which this post entails, the added time above and beyond experience was a year. If I had sat down and done the thing from beginning to end, it might've been more like a couple days (the precious metal clay portions require drying, connecting and kiln time) - but it began with a book, then a class .. then just recently some fine silver wire and deciding how to complete what I'd begun.

It was actually a little over a year from start to finish, since what got me started was a book on metal clay that I received in the mail in the spring of 2008. The thought of making chain with metal clay really intrigued me, and I purchased some PMC3 specifically to give it a go. As often happens with these things, my show season began in earnest and there was little to no time to experiment or play in the studio. So .. I fired the few rings I'd made and tossed them into a round metal tin until a time when I could carry on with the project.

It wasn't until early December 2008 that I thought of those rings again .. when I saw a week's worth of precious metal clay classes offered in Toronto .. by the author of the book I'd purchased! And, one of the classes was chain making! Major body vibrations. A trip to Toronto from Ogdensburg was about a four to five hour trip .. definitely doable. So I did it. Couldn't afford it .. did it anyway. Wasn't sure if the opportunity would come along again. A class scheduled the day before chain making was PMC Findings, so I signed up for both and was off to Toronto in mid-May.

Much of the findings class was familiar to me, as I'd been making my own ear wires for some time; but there were some very cool tips, tricks and style innovations in a couple other areas .. like how to make a nifty little bail device out of 12 gauge fine silver wire (that I've yet to try, but I haven't forgotten!), or adding funky little PMC ends to a piece of fine silver wire to create your own headpins (sterling doesn't hold up well in a PMC kiln). I kept notes, not to mention scribbled all over the poor woman's book (well, my copy of it) because at $250 a pop for the class ($100 material fee was separate), you don't want to forget anything when after paying for the class you can finally dig up the funds to buy the materials necessary to make more of all this stuff!!

I made the two large "ring" segments for a toggle clasp that first day in the findings class (she had some awesome pastry cutters that are on my list for PMC use and purchase). I haven't yet fired the item that looks like a finger ring .. I have plans for it involving resin, and am still experimenting with clear, two-part resin. The smaller rings result when cutting the holes out of the toggle ring, and are saved for .. whatever .. miscellaneous projects later. I've got a collection of little rings and other various fired PMC pieces that'll find a place on a design when the mood strikes.

Thinking ahead for the chain making class, I brought the PMC3 rings I'd made in the spring of 2008 - good thing because it takes a LOT of PMC to make all those rings and a couple toggles! The rings I made previously (at home) set slightly above the larger clay rings in the picture of my work station that day. You'd think from this photo that the resulting chain would be pretty long once all the links were connected .. and you'd be wrong. As I was. The resulting length after firing was about 10.5". Too long for a bracelet, not long enough for any necks I know. Since I have a kiln of my own, and wasn't staying for day three, I very delicately wrapped all of my dried clay pieces up after day two and drove them home to fire them. I was absolutely thrilled with the results! But, of course I wasn't finished. I had only part of a chain!

The process of making and linking PMC rings was pretty time intensive (and relatively costly) so I decided to finish the necklace with fine silver wire. Easier and faster, by far. After one of my best shows in July, I bought 12 ounces of fine silver wire in 12 and 14 gauge (not sterling, which is .925 silver vs. the .999 of fine silver). The PMC segment of chain varied between small and large links, and it seemed the most desirable thing to do would be to continue with this pattern.

I wound and cut all my own rings in 12 gauge, 14 gauge and 16 gauge wire then fused all of the 12 gauge rings together before connecting them to the 14 gauge and PMC rings. I added the smaller 16 gauge rings at the ends last .. I needed them to be smaller to fit through the hole on the toggle. Because the bar portion of the toggle is so long, several rings needed to be able to fit through in order to allow the bar to get all the way to the other side of the hole.

Several folks asked about the sturdiness of the piece - being made totally of fine silver, which is notably softer than sterling - but I can guarantee that every single ring is seriously work hardened; and it would require a lot of force to bend one.

This is one of those pieces I'm feeling just a little ambivalent about selling .. I've been wearing it, dripping it slowly from one hand to another, listening to the soft clinking sound it makes from hand to hand - it's just a little hypnotic, like a slinky. I'm even amazed at how fabulous it looks all crumbled up into a pile of little links on the table! I was going to patinate it, but I just can't bear to do it .. I mean what's the point of making a piece entirely out of fine silver, which is quite tarnish-resistent, only to blacken it all up with a bunch of Liver of Sulphur?

This is an example of what all those high-end juried art shows mean when they say "handcrafted" .. totally made by me, all of it. It's just under three ounces and has a wonderful heft, and yet has been very comfortable to wear. I think I'm in love.

Addendum: Should I have been surprised that the questions I received on this post were mostly "how long did it take to do the wire link portion of the necklace?" Not so much ; )

The necklace is about 22" to 23" long, so about 5.5" on one side and 6" on the other is made up of fine silver wire links .. it took me the good part of an afternoon to wind and cut all the rings and then fuse them all together (the 14 12 gauge rings I cut with a super flush cutter, the 14 and 16 gauge rings with my jump ringer blade). I just purchased a new (and better) butane torch, as the one I have isn't as hot and is a bit slow. I'm not sure how much of a difference in time it will make in fusing and assembling future chain in this fashion, but I had a chance to use one like the one I purchased, and it WAS a whole lot hotter and better for the task. Time will tell.

The necklace is priced at $680 .. and in response to the customer who wrote and asked why a piece" just under three ounces" isn't closer to the $14/ounce that silver costs, lemme 'splain.

Today (August 31, 2009) the 24-hour spot silver price posted at Kitco is approx. 14.88/ounce. This price represents the cost for a 1000 oz bar of .999 silver. This isn't the way those of us who make jewelry purchase silver. We buy raw materials - either wire, sheet, granules .. or precious metal clay. All of these versions of fine silver require fabrication in one way or another. It does not cost me $14.88 an ounce when I buy fine silver wire .. more like (recently) over $20/ounce. And a 25 gram package of PMC3 (28 grams = an ounce) cost me $34.50 in July 2008 .. the package of clay is actually 27.8 grams but yields 25 grams worth of silver after the binder burns off in the kiln. And then there's the time (and experience) it took for me to create the piece. A great analogy would be the cost of the wood it would take to build a house .. quite a bit less than what you would expect to pay for the completed house, no?

A lost relic comes home

This is probably the most unusual personal story I've ever experienced .. it encourages me to believe in the return of more recently lost treasures, especially since this one was lost over 30 years ago while I was working at Community Savings Bank in Watertown, NY (and not surprisingly considered gone for good). The relic in question is my high school class ring.

The story began with a Facebook "hail" from a classmate asking if I'd heard from her boss regarding my class ring (I vaguely remember a first cousin being involved in there somewhere as well, and having spoken to him .. but I can't remember where he fit in the story, so we'll just leave him out).

After waiting several weeks or more to hear from my classmate's boss, my classmate just took the bull by the horns, snagged the ring and sent it to me with the story, as she'd heard it .. in her words:

"... Someone finds your ring and gives it to the Watertown cops. They, in turn, hand it over to the Carthage cops. Carthage cops, with all the latest technology, go to the local donut shop to do a little detecting. With only a minimum of clues (high school, year of graduation & initials), they decide that it is unsolveable and they put it in the cold case files (or in this case, Chief of Police takes it home and puts it in his underwear drawer. I know - horrible thought - you better get that ring cleaned!) Anyway, 35 years later, said cop's daughter finds the damn thing while cleaning out said underwear drawer. (I can't stress to you how important it is to clean that ring!) Cop's daughter says, 'Hmm, one of my employees graduated in this class, I'll ask her.' 5 minutes later, Eureka! Moral of the story - don't trust the cops!"

I laughed out loud when I read it. And, of course, when I looked in my class yearbook, I am the ONLY KMC in the entire graduating class .. how difficult could it have been? Well, I guess when you're up against donuts, pretty damn difficult.

As a result of this little personal mystery, I've connected with a classmate who I didn't really know in high school and who in my estimation "clicked" almost immediately after we began exchanging notes (a great sense of humor, you must admit) .. and have an invitation to check out a relatively new and highly recommended restaurant in Carthage next time I'm in the area (my mom's only about ten miles away, so it'd be an easy trip) .. as there are few restaurants of that description up here in Ogdensburg, I'm looking forward to the next opportunity to give her a call!

.. and the ring still fits.

Addendum: Yes, folks, I cleaned the ring .. in my tumbler with steel shot, liquid soap and ammonia .. for about an hour!

Thursday, July 30, 2009

Knotty .. in a good way

A new customer, recommended to me by Mary Ann Evans (of Mare's Wares Pottery), brought me a tender little knotted necklace while I was at Mare's July 1st Arts Fest and asked if I could put it back together again. Despite having had it in my possession since July 1, I only just recently completed it because I had trouble finding red cord of the right diameter, the color which had originally been used to knot between the beads.

The biggest surprise, however, was when I cut the necklace apart to begin knotting .. I initially thought the beads were red (garnet, was what I was thinking at the time), but it was the little red knots between the beads that caused that optical illusion. When the beads were all cut apart and sitting in a little ceramic dish, devoid of red cord, I discovered that they were carnelian .. a very pretty deep orange and not red at all! And to complete the weird optical illusion aspect of this venture, the silk cord I finally found that fit size-wise was burgandy .. though when next to the carnelian beads looked very much like a deep brick color, and matched the shade of the beads exactly! The brain is a wonderful thang!

The problem I encountered with the burgandy thread, however, was that there was no longer a marked contrast between the beads and the knots between the beads .. I knotted about 20 of them with the burgandy silk and, while very pretty, decided I'd better call the customer and ask if the contrast was important .. and explain what the new configuration looked like. Turned out she was fine with the lack of contrast (I would have had to order another spool of thread, too .. though I was happy to do it) and suggested I carry on. If you click on the photo, you should be able to tell the beads are carnelian. From a distance, they still look red though .. don't they?!?!

After this little exercise, I found myself in a knotting frame of mind and looked through my bead drawers to see what else I might put together in the same vein. I had several little baggies of rectangular pendants I had purchased from Silk Road Treasures at a show five or six years ago .. one little baggie with pale green jade, one with dark green jade and one with lapis. I pulled out the pale green pendants and found about ten or twelve different stones that would provide some nice contrast and completed the tin cup design shown here .. which I call Mountain Ash.

It's a nice mix - there's Mexican opal, green garnet, hessonite garnet, yellow turquoise, orange aventurine, jade, carnelian and pale yellow quartz (plus some Czech glass and #10 seed beads). At about 21", its one of the first long ones I've made in a bit. I added a very simple gold-filled hook and eye clasp .. it's very light weight. It was the colors I saw in our own three mountain ash trees that stand between the house and the river - and can be seen from my studio window - that gave me the idea for the name.

After that I was on a roll and just kept rummaging. I've got a couple drawers full of turquoise, but haven't done anything with any of it in a long while, so found some pretty faceted rondelles with small enough drill holes to allow for knotting and put together this really nice piece! I used turquoise-colored cord, so it blends in quite well; and the knots between the beads allow for a really nice flexibility in the strand. The clasp is handmade in Bali and is a design I sought out for what seemed like months after purchasing a necklace for myself with this same clasp from a little boutique in Albany. Was so delighted when I finally found them, I purchased five or six at the time .. there are only two left. I've tended to use them sparingly; but this piece seemed to call for it. I don't have a name for this one ... any ideas???


The green design came about after I ordered and received a strand of Labradorite marquis cut oval beads, one of which plays center stage here. I tried multiple times to get a close up of the pendant with its hidden opalescence .. but it just stayed hidden. All I could get was the reflection from one of my lights. Labradorite is a type of feldspar .. moonstone is in the same category - they both remind me of opal with their little internal rainbows brought out when the light hits them in the right way or in the right spot. There were several of the pendants on the strand that were rich with these surprising little bursts of color .. all the more likely with so much visible surface on such a large bead.

The strand, on the other hand, is not Labradorite but tourmalated quartz .. both the strand and the pendant have some naturally occuring bits of black in them, so I used black silk to knot; and I couldn't have been happier with the result! It's at once both simple and stunning - I gave it a spare and simple sterling toggle clasp .. I didn't want to take away from the strand in anyway. I call it Green Lagoon because the particular shades of green made me think of a sandy, warm and tropical place.

I'm now working on some variations of the Mountain Ash piece (I might pull out the darker jade and use a couple of those and/or assemble a whole 'nuther collection of stones and work with the lapis pendants) .. and I've pulled a bunch of little baggies full of possible strand and pendant mixes for some more knotted combos after that. AND (I forgot to mention this) since the catalyst for this knotty run - the carnelian and citrine necklace at the top - was completed using French wire, I've finished all of these using French wire instead of bead tips to attach the clasps to the body of the necklace. When done correctly, French wire (a tiny, itsy bitsy little wound wire tube) creates a little loop through the clasp and protects the cord from abrasion. It also looks very neat and tidy and is often used on high-end pearls. I haven't used French wire in a long time .. it's always good to refresh one's skills occasionally, no?

I expect there'll be a whole area of knotted pieces by the time the Stone Mills show in LaFargeville (August 7, 8 and 9) rolls around. I had a request for pearl bracelets at my last show though .. so gotta balance my time. There's so little of it, you know : )