Wednesday, August 29, 2012

Zentangles and Jewelry

I can't remember when I first became aware of Zentangles .. though I DO know that it was through one of the many jewelry magazine subscriptions I was receiving. There was an article on the art form which really intrigued me. Anyone can do it, and there are "Tangle" books of all sorts available with designs to try. Though the place to begin is at the Zentangle site http://www.zentangle.com/- click on the little "play" button at the bottom to see a slide show of various designs (or go to their blog link in the upper right corner to see what creative things people are doing with them!)

At the time I was interested in trying to make my own photo sensitive texture plates out of a Zentangle design for use with metal clay, then it occurred to me that getting a rubber stamp made from a Zentangle might be the better way to go. Helen Breil beat me (and probably a whole lot of others) to it. She took the idea and really ran with it. I have to admit, it was much easier to just buy one than to go through the whole process of making a bunch of Zentangle designs, and then send them off to .. where ever .. to be made into rubber stamps. I imagine it would take a whole lot more time and $$ than it did to purchase the five I have. Helen currently has twelve designs. You can see them here: http://www.helenbreil.com/Textures.php. I purchased Mambo, fandango, Conga Line, Tango and Watusi .. though now that I can see some of the newer versions, I may have to buy another one or two!

For the past four years or so I have been stocking up on various tools and materials with the intention of getting into Polymer Clay designing. When the price of silver and gold skyrocketed, it seemed like an interesting medium to play with; especially since I was seeing a lot of impressive jewelry being made with the stuff. I've been collecting books, tools of all kinds, acrylics, silk screen sheets, at least one DVD ... and clay. A whole lotta clay (after doing very well at several recent shows). Helen is a Polymer Clay artist - she's got a website (and a Facebook page) full of some of the fun stuff she's done with her own texture tiles  http://www.helenbreil.com/ .. and I had originally purchased the texture plates for polymer clay. 

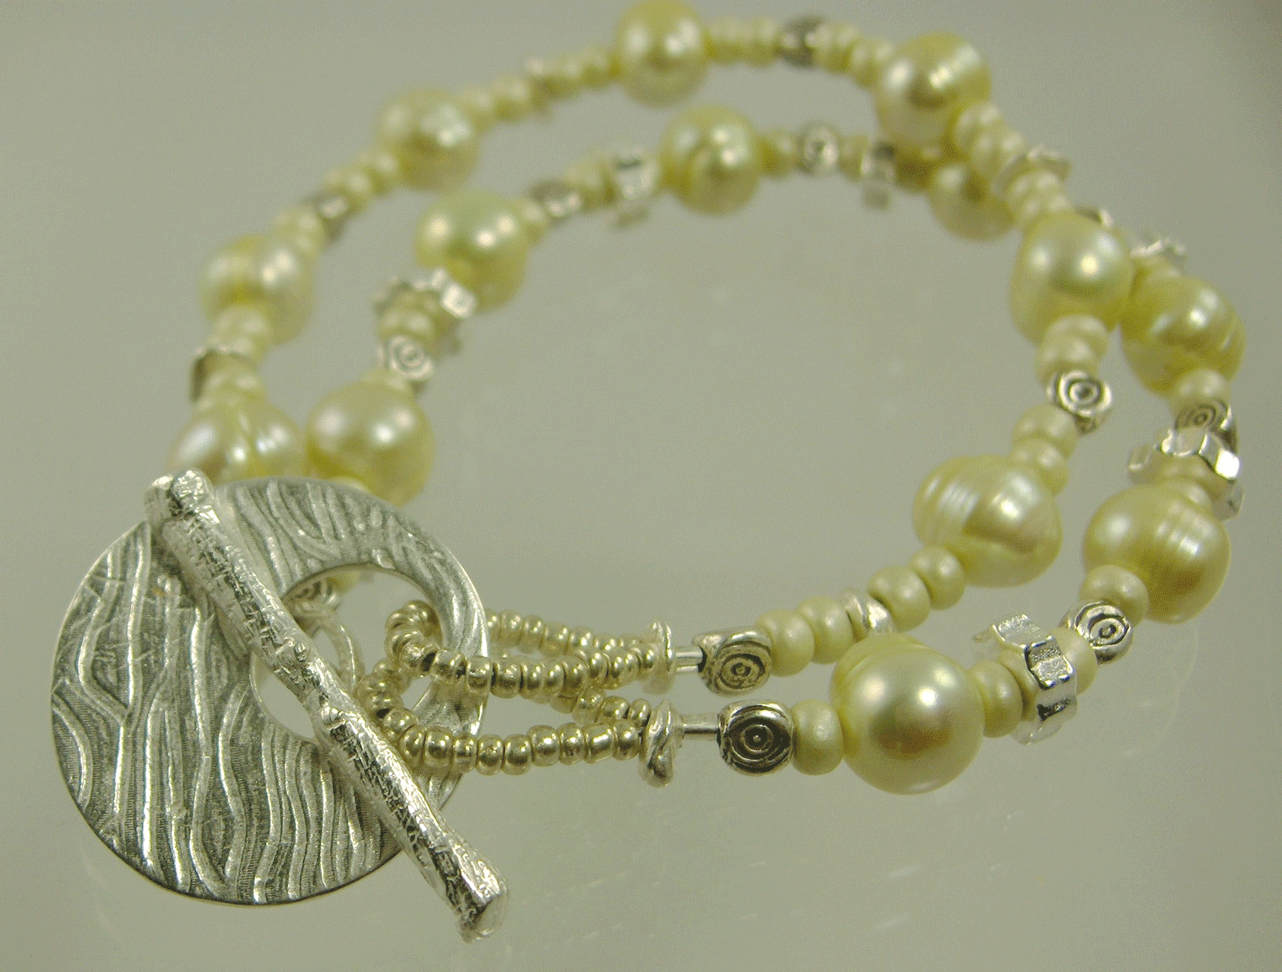
However, I ended up using one for the first time a few weeks ago to make a fine silver (precious metal clay) clasp for a new Byzantine bracelet (for which I cut all those rings recently). It was the Mambo texture I used; and I have to say, I was initially concerned that there wasn't enough depth in the texture tile to really allow for a good impression. This is quick photo I took of the Mambo tile (they're all about 4" x 5").


And this is the bracelet and clasp that came out of the experiment! I thought it impressed quite nicely!! The finished bracelet is a little too big for me, which is just as well as I'd be inclined to keep it.


I have a couple of clay stamps I use with metal clay (and will probably use with polymer as well); one is just my business name, the other is my logo. The name seemed more appropriate for this piece.


I thought the finished design, as it appeared on the clasp, looked a little like a Nautilus. So that's what I call it.  It's much more impressive in person (did I mention I'm still getting used to this new camera?!?)  : )  


Tuesday, August 28, 2012

Been a long time comin' ..

So, it's been a while. Lost my enthusiasm there for a bit. Also lost my laptop hard drive and my camera.  Well, maybe "lost" is the wrong word. The laptop was seven or eight years old, the camera at least that or more. Neither owed me anything and the laptop was a workhorse .. and it was time to move on from Win XP. I have since replaced both, the camera just recently though .. and have experienced the frustration of learning to use a new device. You all know what I mean .. it doesn't do what you hoped or what you expect or what you were used to. You get there, of course. But it's time consuming.

I recently wound and cut jump rings for the first time in quite some time. Long enough to have destroyed an expensive cutting blade on my first attempt. Fortunately, I had a back up. I thought it might be fun to record the experience for once. I made the mistake of using my Samsung phone camera rather than a tripod and my new Canon Powershot, however. So please accept my apology for the few (OK, several) out of focus photos. I will have to order more sterling and gold-filled wire before I can give it another go (and that's coming soon); but thought you might like to see the process anyway.

I have a collection of mandrels in different sizes that fit into the chuck of a chargeable drill. The Jump Ringer kit I bought came with a manual winding tool, but the drill is loads faster. However ... one can slice a finger with an errant piece of wire end pretty quick. The green tape is called Alligator Skin, and prevents accidents. I usually put leather "thimbles" on the tips of my fingers and then wrap the tape around them.


I wind all the wire I will be needing first. I try to remember to make the spiral lengths short enough so that there will be room in the cutting trough for the blade. My original Jump Ringer kit came with a shorter cutting block. I purchased separately the one I use in these photos. Otherwise, I would have had to wind the spirals at about half to three-quarters of their existing length.

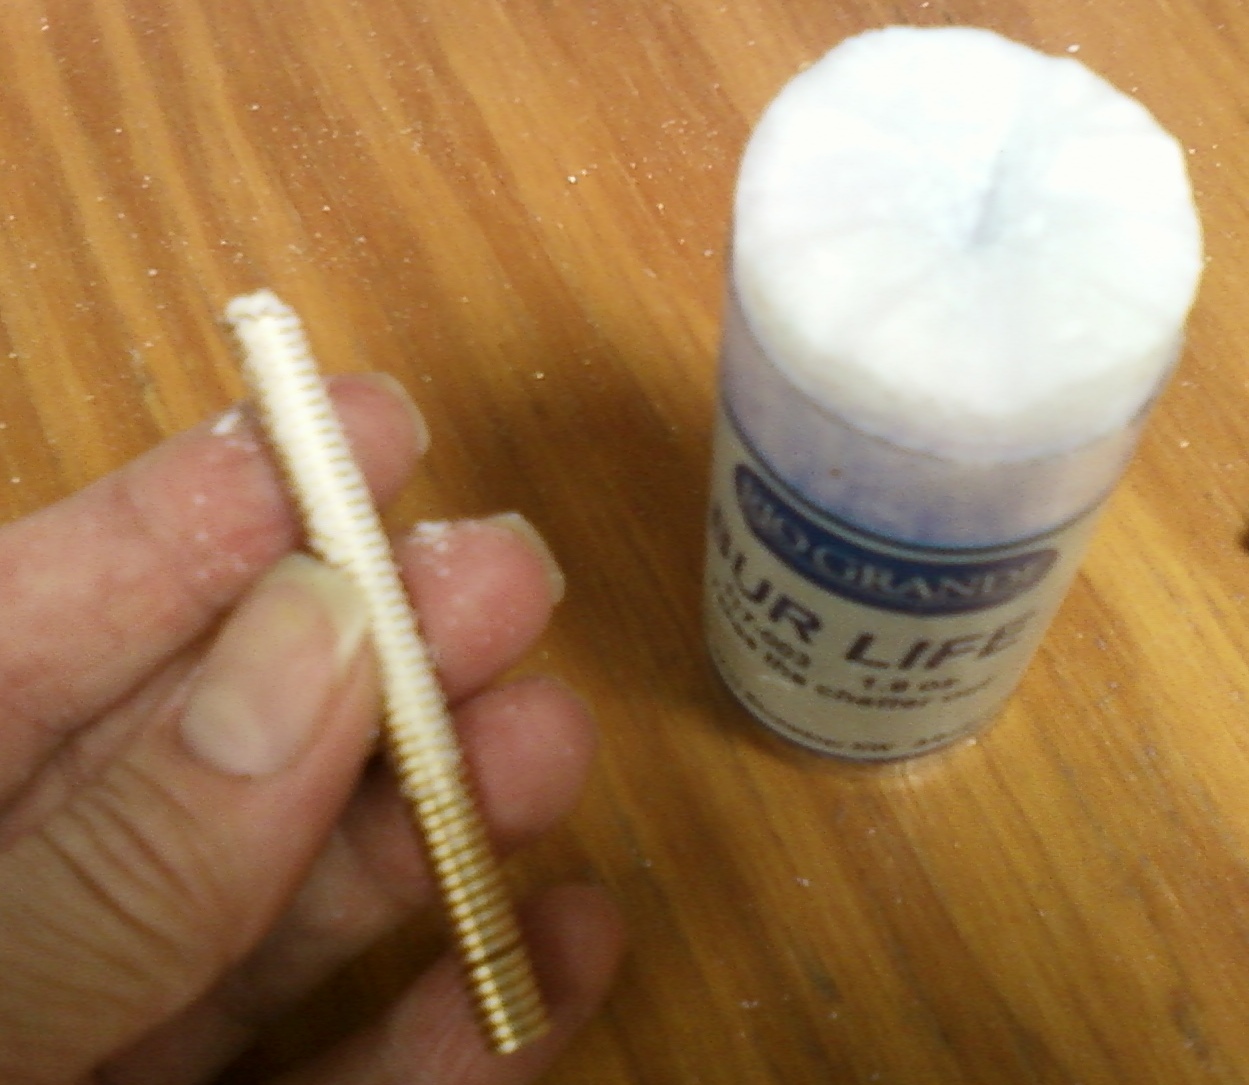
Before cutting, I liberally cover the area on top of the wire spiral .. the part through which the blade will be cutting .. with a waxy lubricant. Your blade is likely to last a lot longer if you do this (that is if you haven't already destroyed one through thoughtless procedure).


There are four different trough depths on each of the four sides of the cutting block. The wire spiral goes in the center of the trough .. again, so that the blade has room on the front and back end of the trough when you're cutting. The lid with the slit (for the blade) goes on .. the two little thumb screws hold it down.


The spiral should ideally set just a bit above the edge of the trough. The reason I destroyed a blade was that my spiral sat TOO high. Silly girl. At $10/blade, that's a costly error.


This is the blade housing .. it's attached to a flex shaft (I suppose you could use a Dremel, but I'm not certain). The blade is visible in the photo below .. it fits into the slit in the top of the cutting block, and the sides of the housing fit snugly on either side of the cutting block.


One of my more blurry shots .. sorry. When you're assembling the blade and housing on the flex shaft, you want to be sure you have your blade on correctly, so that it cuts in the right direction. Putting it on upside down is another good way to destroy a blade. Had a left handed jewelry maker in the studio once, showing her how to use the device .. after a couple false starts, we ended up purposely putting the blade on wrong, and then moving the Jump Ringer housing from left to right instead of right to left. It's a wonder we didn't strip the blade of all its teeth in the process!!


When you remove the cover after cutting, your spiral is now a bunch of independent rings. Yay!


I run a piece of copper wire through them while they're still a little bit stuck together by the Bur Life, twist the two pieces of wire together to make a little teardrop shape, and drop a bunch of these little bundles into the tumbler with a little Dawn dishwashing liquid and water. I leave them to tumble for anywhere from 30 minutes or so to a few hours (sometimes I just forget!). The tumbling not only cleans off the waxy lubricant, it also shines up the rings and work hardens them a little bit. Just a little bit. But every little bit helps .. depending on what you intend to do with them.


I did manage to get a few shots of the two items I ended up making with my new jump rings, and I promise I'll post those next. I even used the Canon .. though with a whole lotta frustration involved. I mean shouldn't macro mean close-up? Then why all the blur when you move in close. I'm thinking I might have to actually look at the manual! But .. I did get enough photos to post and will do that soon!


Friday, March 4, 2011

Ch ch ch ch changes ...


Maybe it's just that my brain is wired in a strange way, but when I get a commission to create a special piece, it almost always starts out in my mind one way and inevitably ends up being something entirely different when it's completed. Perhaps this creative process is common in those who do this kind of thing; all I know is that it's a fun, stressful, creative and frustrating adventure every time .. and I love it. Especially since the end product is usually as much of a surprise to me as it is to the recipient!

This Remembrance Anklet began as a request by a friend of mine on behalf of five women (the five named on the tags) who wanted a special retirement gift for a friend of theirs. The recipient wanted an anklet - I don't make many these days, because they just don't sell much up here, but got the measurements and started thinking about how to go about it.

The spokesperson for the group and I went back and forth regarding using initials, versus entire first names, and whether or not to add crystals or stones to indicate birthdays for each of the five and to create a little sparkle in the piece. I also toyed with different clasps .. a commercial clasp vs a handcrafted item. I decided I could do complete first names; but putting five name tags on a length of chain (even ten inches of chain) is going to take up most of the space. So I had initially looked in all my various supplier catalogs for existing blank sterling tags of a particular size and shape with pre-punched holes on either side. The longest name was six letters, so I needed something long and narrow, yet high enough for the letter punches I have in the studio.

I wasted a lot of time in that process .. most of the blanks I found were round, square, too big, too small, not pre-punched, etc. I knew I wanted a sort of elongated oval .. that was my ideal; and perhaps there's a source out there somewhere that sells exactly what I was looking for, but none of my usual sources had anything like it. So the sterling chain and charm piece I had originally planned on wasn't going to work. There was nothing for it but to create the thing from scratch. I have some sterling sheet and could have cut out five ovals and punched them all in the appropriate places before adding the individual letters. But as I had some PMC3 on hand .. the strongest of the three silver metal clays .. I decided to make the thing entirely out of fine silver. An added benefit of using PMC3 is that the initial letter size would end up being about 10% to 15% smaller when they all came out of the kiln (which wouldn't have been the case if I'd stamped directly onto sterling silver blanks).

Well, the decision wasn't exactly a mistake, because I loved the finished piece, but geeeeeeez! Can't tell you how many times I rolled and re-rolled a piece of clay because I didn't get the letters P E R F E C T. I finally decided that as this was a handcrafted piece, the natural flaws in the piece were indicative of the "handcrafted" process and were to be enjoyed as part of the love and attention that went into the giving of the gift and the making of the gift. Not your machine-made piece of perfection, but a solid piece of backbreaking work (believe me, all that micro sanding of each and every little name tag charm was indeed back breaking ). And I won't even mention the trouble I had with the kiln .. oy!

After I had all the charms cleaned up, fired, tumbled, work hardened, and then dapped to create a slight curve, I wound and cut a length of fine silver wire into all the rings used to connect the pieces and create the additional chain needed to bring the length out to what was needed (plus a little more, just in case). For just a moment .. and a moment only .. I thought about adding the "birthday crystals" to dangle prettily at the end. But it wouldn't do .. it was no longer the kind of design that would support crystals aesthetically. So, what I used were small Thai silver beads .. which are also fine silver. They're a lot sturdier than the crystals would have been .. and they meld into the design so much better. As the rings in the chain were large enough, I was able to create a long, narrow hook clasp that I'm certain will prove to be secure and which could hook into any of the rings along the length for a perfect fit. Once all the rings were fused, I went down the entire length of the chain and tapped around each and every ring on an anvil to work harden them for strength. And after all THAT, I dipped the entire piece into a dish of liver of sulphur to blacken it .. I mean really blacken it. Then I systematically went over the entire piece with steel wool to clean up most of the blackening, but allow the letters to "pop" on the name tags. The final touch (like adding the title page to a paper you've slaved over for weeks!) was tapping my business name into the back of one of the tags.

I hope the recipient was as truly happy with the end result as I was .. not having sold it directly to her, I only have the word of my go-between (which was positively glowing ). It's always great to sell a piece I've made .. but these particular kinds of sales never fail to make me feel like I've really accomplished something. The emotions attached to it are a little more intense and personal, and that just makes it all so much more worthwhile.


Friday, August 13, 2010

With all my heart

I honestly believe that necessity is the mother of invention. There are books (and websites) full of this kind of "positive attitude overcomes adversity" type quotes and phrases .. heady things like Nietzsche's "What doesn't kill me makes me stronger" as well as lighter fare, "When given lemons, make lemonade" .. and the more poetic "Sweet are the uses of adversity, Which, like the toad, ugly and venomous, Wears yet a precious jewel in his head .." by Shakespeare. I love that. It really gets to the heart of the matter. Sometimes there is a silver lining. And sometimes things happen for a reason .. whether or not one can work with that is up to the individual. Easy enough to feel sorry for yourself. I tried not to do that, but when you can't work (and I really couldn't at first), it's a bit depressing. Spent a lot of time and money looking for a "quick fix" .. chiropractic, physical therapy .. acupuncture.

All of which helped a little; but my all-encompassing issue has always been chronic yeast and I think I knew down deep that it was feeding the inflammation and I'd have to do something drastic dietwise before my wrist would begin to heal. So, I finally got down to it about six weeks ago. While strictly monitoring my diet in an effort to beat out the yeasty beasties and ever so slowly repair my painful wrist, I've had to rethink my jewelry designs. Things improved dramatically after I went on a modified allergy elimination diet .. and I continue to be able to do things around the house and in the studio that I couldn't back in May and June .. but it's still not quite 100% yet. There are more than a few designs in my inventory (or long gone) that were real wrist-wrenchers in their creation. I'm aching - so to speak - to get back to the elaborate and time-intensive chain maille and wire wrapped bangle designs that leave me feeling so incredible satisfied when a piece is completed! However, while I attempt to keep from doing any more harm to my wrist while I continue to pump up my inventory, I've necessarily had to change course a bit. Stringing was the least painful thing I could do, but, you know .. been there, done that. And there are more beaders out there than ants in an anthill. If the right design comes to mind, I will still occasionally toss in a beaded design (and there are some old beaded design favorites that continue to do well) .. but I'm all about new and different. I like learning and trying new things.


So .. went in a just a slightly different direction with a new line of Talisman necklaces (bracelets may be forthcoming, we'll see). I'm not one to believe in things you can't see, but I do believe - as I've already explained - in attitude adjustment. And sometimes we need to be reminded that "every little ting will be ahright" .. that we hold the key to our happiness. It was this "key to happiness" thing that had the lightbulb shining over my head this time. I bought a bag full of old skeleton keys from an antique dealer when the whole Steampunk fad emerged as the "new thing". I wasn't sure exactly what I was going to do with them, but I'd also purchased a bunch of old watch parts (and got a bag full of old watches, too) in a casual search for Steampunky components. I'd had visions of resin-encased bits-n-pieces pendants, but am still experimenting with clear resin .. and wanted to stay away from chemical fumes while I continue to heal. One day I was just messing around with some fine silver fun phrase tags I'd made .. affirmations, declarations, cliche things .. and came up with this lavish piece I call "With all my heart" (inscibed in french on the little fine silver tag). It just kind of took off from there.


I haven't yet photographed them but I've also created "Sea Change" and "Live Juicy" (a recommendation made popular by the colorful and ever-positive Sark). And I have additional tags awaiting their own necklaces for "Je ne sais quoi", Jois de vivre", "one day at a time", "this too shall pass", "In vino veritas", and one about an acorn that I'm still working on. I had toyed with calling them Affirmation necklaces .. but "Talisman" had a better feel. One of the definitons I found was, "anything whose presence exercises a remarkable or powerful influence on human feelings or actions." That was closer to what I was trying to do when I thought about the idea behind the pieces.

These jingly and sometimes musical little pieces make me happy .. I've tried to make each of the three I've created so far different in design from each other, but this, the first, is really glorious! It's got almost three feet of patinated sterling chain; bright, bold coral; and a little puffy Thai silver heart. It's long and substantial, yet when I wore it around last weekend for a test-drive, I forgot I was wearing it .. well, until someone mentioned it. Which happened a lot. This is one of those pieces I may have to keep.

I'll try to get the others up soon, but things are a little crazy at the moment .. I have a two-day show this weekend here in Ogdensburg. A 2nd "annual" Wine, Beer & Food Festival .. for some unfathomable reason split between two locations: the Lockwood Arena over on the corner of Main and New York Avenue and The Dobisky Visitor's Center down by the water. I'll be in the Dobisky Center with a bunch of other artisans .. the better of the two locations, I'm thinking. Especially since that's where all the beer, Bar-B-Que and entertainment will be. Saturday 11:00 to 6:00, Sunday Noon to 5:00 .. stop over if you're in the area! It's supposed to be an absolutely gorgeous weekend!

(Thanks to Heather Wynn for the design idea!)

Sunday, June 20, 2010

Still Spinnin'


I've been doing a whole lot less stringing over the last year or so, mostly because I've been having fun with wire and metal clay, among other things. But I've had to put my beading cap back on and come up with some designs that put less strain on my wrist as it seems, after almost five months, that I'm still dealing with some pain and discomfort. For a while I couldn't even make a simple wrapped loop on an earring. That isn't the case any longer, but working with anything thicker than 18 gauge (dead soft) wire has me reaching for the Ibuprofen before bedtime. I feel a little improvement now and again, when I realize I can do something I couldn't do even a couple weeks ago without pain, but it's been very slow. I have every confidence that I'll get to the other side of this, but while I'm waiting I have to think about the few shows I have coming up. So .. I rummaged through my collection of materials this week and found a whole box of Czech glass seed beads!

There are any number of secreted, forgotten surprises down in my studio .. boxes, bags and baskets full of stuff stashed away for later use. You know how it is .. if it isn't out where you can see it, you tend to forget it's there. Most of the seed beads I have are 6/0 size .. a bit larger than what I wanted for a multi-strand necklace that began materializing in my head. I needed something that would allow three or four strands to fit nicely into the sterling Bali cones I also found while rummaging. These matte black beads were perfect for the job! (There are some other colors I found to play around with as well .. this one just worked with the color scheme I needed at the moment).

The little pale green beads are chrysophrase, a real pretty stone that often looks like it's illuminated from within. They're interspersed with 4mm sterling silver round beads.

The cones that capture the strands at the clasp are absolutely gorgeous examples of granulation. These were hand made (not cast) by artisans in Indonesia .. each one of those little dots is applied one at a time. You should be able to click on any of this photos and see the piece close up.

The toggle clasp is also an Indonesian hand made component. You can usually tell the difference between truly hand made Bali components and those that are more cheaply cast by the way they look upon closer examination. "Bali Style" components which are cast look sort of like they were partially melted in the sun. Because the silver is poured into a mold instead of created from scratch, the individual design features lack the sharp detail of individually placed design segments - they run into each other instead.

The pendant is turquoise and is hinged in the center .. it's also removable, so you can wear the strands without the pendant, if you choose. The first thing I thought of when I put all the colors together was a panther .. you know, black as night .. with green eyes? But I couldn't name it "Black Panther" without thinking about the 60's and the negative connotations .. so I called it "Jungle Cat" instead.

It's currently in a beautiful Arts & Crafts oak display case at Mare's Wares Pottery on Route 37 in Morristown .. the site of an upcoming show on July 1st. Look for more information about the show at either www.artisansoftherivervalley.com or on Facebook at "Mare's Wares Arts Fest". If you're in the area, stop over .. it's going to be an incredible day!

Monday, March 29, 2010

A Positive Spin

I've been out of commission for several weeks due to a repetitive strain injury in my right hand/wrist. It just amazes me whenever I do something like this to discover just how much we use a particular muscle or body part! The problem was caused by a little too much laptop data entry .. it seems I overworked the joint in my right thumb, which created a little swelling in my wrist, just below the thumb pad. I feel like I've gotten a rather painful anatomy lesson. It's difficult enough turning the ignition key in my car, or shifting, or washing dishes, or opening a jar, or dressing, or putting on a jacket, or brushing or drying my hair .. making jewelry was out of the question.

However, after cleaning up portions of my studio - which could be done without hurting myself and was sorely needed - it was tough not to develop a whole bunch of ideas while putting away wire and pearls and stones and findings and stuff. It was an idea from an artisan friend though that finally had me thinking about what I might pull together, despite my (hopefully) temporary incapacity.

The idea was a donation .. she and I and several other friends are part of an artisan group covering three local counties (check out the link to the Adirondack Artisans Guild over on the right). My friend's daughter is coordinating a fund raiser at the school where she works in California and suggested that our group might open ourselves up to a whole new market if we were to donate as a group. I'd totally forgotten about it until the last minute, so didn't have a whole lot of time .. plus I couldn't pull together the sort of wrist wrenching wire work I would have liked to have created for what I saw as an opportunity to advertise along with my tax deductible contribution. I always think of California as ahead of the curve in style and accessories .. I wanted something a bit different and eye-catching.

So .. I pulled out one of my funky fine silver toggle clasps .. this one is about 8 grams of pure silver and is textured on both sides, as you can see from the photos here (one side is a sort of checkerboard, the other is a wavy pattern). I might have normally fused some smaller fine silver rings to both ends and attached something with stones and silver beads and more fine silver connectors. But I thought that stringing a bracelet would be less stress on my wrist, which turned out to be the case. The clasp is about an inch across though .. a single strand, unless relatively large beads were used, would be overwhelmed by the large clasp.

Add Image
I spent an entire day working out the design, color scheme and additional beads to be used before I finally began to assemble it. It was seasonably warm and sunny last week when I put it all together .. mid 40's, which is seasonable for this time of year in northern New York! I had initially chosen some peacock blue pearls .. they looked fabulous with the silver accents, but it was so dark. So I went rummaging through my pearl drawers and found these pretty, bright, and very Spring-like Celadon-colored fresh water pearls. And as it happened, I had some similarly colored 6/0 Czech glass beads to fill in the strands. I originally tried to use them to make the bead loops attaching the ring portion of the clasp to the strand, but they turned out to be just a tad too big. It was difficult to get the bar part of the toggle to fit through the hole when the 6/0 beads were taking up so much space inside. Fortunately, I found some smaller seed beads that fit the bill .. both in size and color. The rest of the strand is comprised of little three-sided Thai silver beads, some tiny little fine silver nuggets I made, and some very cool "gear" shaped beads made of silver-coated ceramic.

I have to tell you, it's been a LONG time since I've used crimp beads in a piece. I spent a good half hour looking for both crimp beads and the special tool one needs to attach them to a strand. All of my strung pieces use either beads tips or French wire to attach a beaded strand to a clasp .. but I couldn't figure out a way to attractively do it. The problem with crimp beads is that if you crimp a little too enthusiastically, you'll destroy and weaken the integrity of the wire inside the crimp bead; if you don't crimp firmly enough, the wire will ultimately work its way out of the crimp bead and all your beads will slide off and disappear.

I was delighted both by my ability to still be able to crimp properly AND with the design and look of the bracelet when it was done! It's very bright and Springy .. I called it Spring Fling. Hey, I was on the clock .. it was the first thing that popped into my head. It'll do : )

The event is scheduled for May 1 and is called Moroccan Nights: An Evening in Casablanca .. and doesn't THAT just conjure up a whole bunch of wonderful images in your mind .. dark, smoky jazz clubs, slinky gowns and swept up do's, mysterious strangers ... Bogey?!?! The paperwork suggested that ALL items will be put online for bidding unless the donor requests otherwise .. and why would anyone request otherwise?? The school is www.vistamarschool.org .. and I'm assuming there'll be a link somewhere on their site to the silent auction items once they have them all in their possession. I'll certainly keep you posted! : )

UPDATE: The link for the online auction portion of this event is up for viewing. Though bidding isn't possible until April 13, you can still scroll through what they've put up so far. I'm told there's a whole lot more to come. The site may be found here. If the link doesn't work, just copy and paste this: http://www.biddingforgood.com/auction/AuctionHome.action?vhost=vistamarschool

Monday, March 1, 2010

Sweetheart Pin with pearls


This large and fabulous pin design has taken on a life of its own. It began with a project by Sherilyn Miller from one of the many jewelry magazines to which I subscribe. I made the pin exactly as the project described, and even sold a few - which hadn't been my intention. I usually view projects like this as a chance to stretch my skills .. you make the project and hope that what you've learned spurs you on to other things. Even better, this one project has been the springboard for more variations than any other design project I've ever tried. From this simple pin design I came up with a beautiful bracelet idea .. called Tranquility (though I called the one I gave my friend for her April birthday April Showers). I did so incredibly well with those bracelets - which varied slightly in size and stones, though remained always a soft shade of blue - that I'm working on trying another color scheme for it this year. It was the pin's most recent transformation that made me think that pearls and crystals might be the way to go.

I might have ultimately come up with the pearl idea on my own, but it was a potential customer who saw at a small show in Watertown a similar pin I made for a friend of mine (who was wearing it at the time). It was the same size as this pin (I have made a smaller, more delicate version, but neglected to photograph it before someone purchased it) but was covered in three different stones representing the birthstones for my friend, her husband and their son. I explained to her what the stones on my friend's pin represented and she asked if I could do one in jewel tones. Not a problem, I told her. But after subsequent back and forth emails with multiple scans of various stones and crystals, she asked if pearls and crystals would work. Even better, I thought. Clean, simple, romantic .. with just a little sparkle.

I was pleased with the finished pin .. about five or six of the crystals are small, 4mm round, clear crystals with an AB (aurora borealis) coating on them. It adds just a little flash of color without going over board (though no matter how many shots I took, I couldn't get that little flash of color to show in a photo). I've got several drawers full of white and cream pearls, so I was able to create a pleasing mix of different sizes and shapes.

For the moment though .. it's 2009 year-end and taxes that are scrambling the synapses in my cranium .. so the creative side of my brain is taking a break while the analytical side takes over. And that, my friends, is where the trouble usually begins ...

Stay tuned!

Sunday, February 7, 2010

It began with a bead ..

.. in the spring of 2009. The bead belonged to my potter friend, Mary Ann Evans. I had been showing off a bracelet I'd made which contained an old African trade bead, and she pulled out this large, colorful bead to show to me. It's about an inch and a half long and a half inch wide and appears to be a glass millefiori trade bead.

Beads similar to this can be traced to ancient Rome, Phoenicia and Alexandria. Archaeological sites in Ireland uncovered canes dating to the 8th century that were probably made in Venice. Prior to the 15th century, glass makers were only producing beads from Rosetta canes. Like Chevrons, Rosetta beads were made by adding a number of layers of colored glass in a mold and then pulling it from either end into a long cane. The cane was then cut into short segments.

Large scale Millefiori bead production began in the late 1800's. Beads were made by hand, one by one, built on a center glass core with solid color. Thin slices of colorful Rosetta cane were then pressed into the surface of the wound glass while still hot. Millefiori became one of the most commonly traded and popular beads. My friend's bead looked to be of a similar type .. singularly handmade. The glass core is black; and you can see two entirely different Millefiori slices were pressed onto the core. Here's a link to some similar examples: Millefiori trade beads

She handed the bead to me and said "See what you can do with it." So .. I took it. And it sat inside a little zip lock bag on an area of my work bench where I could see it pretty much any time I was working. She had suggested "a pendant or something" .. but it kept whispering bracelet to me.

Things were pretty crazy between June and November last year; but I think an idea began percolating almost immediately. Since the bead was so large, the piece had to be on an equal scale. But I didn't want it to be big and bulky, since the few things of mine Mary Ann owns are rather delicate. However, after discovering her wrist size was a nice average 6.5", I felt she could carry off what I had in mind.

What I ended up doing was making it entirely out of fine silver links .. in a gauge heavy enough to allow for some attractive hammering and forging without the weight. The five links attached to the hook mimic the design splotches on the bead, and the mother of pearl and blue sponge coral beads pick up a couple of the dominant colors. Despite the heft of the trade bead, the bracelet is very light weight.

The larger of the links contains wrapped 2.5mm mother of pearl beads on fine silver wire.

I've already given Mary Ann the bracelet or I would have taken another shot of this link .. there's actually a front and a back to the bead, and this, much to my dismay, is the back. The wire extending up to the bead isn't as prominent in the front. It still looks good, but I'm sorry I didn't notice that when I was taking the photos.

As I've mentioned in previous posts about pieces containing fine silver, one can "harden" fine silver by giving it a good going over with a hammer. This changes the composition of the metal's crystals in such a way that a very malleable piece of wire becomes very rigid. It would be difficult to bend several of these links without a bit of effort. Because fine silver IS so soft, however, it's easy after flattening and hardening a link to add a little surface design interest with whatever might be at hand .. in this case, the smaller ends of several different types of hammers in my arsenal. It's a funky piece, to be sure; and I like it enough to maybe try a similar design with a slightly different focal bead. I have a whole lot of them from which to choose, so we'll see what kind of interesting pieces I can get out of this idea. This particular piece I called Manic Millefiori.

Might be time to purchase some more fine silver wire!

Thursday, December 10, 2009

Prolific Progeny

I used to do "Progeny" bracelets all the time about six or seven years ago .. the kind with the little square sterling letters that spell out the names of the recipient's children or grandchildren. I still have some of those little letters, though I haven't used them in quite a while .. and they certainly would not have worked for this commission, which needed to represent 17 grandchildren! I doubt the recipient has a wrist sturdy (or long) enough to endure the weight of 17 little sterling names! But then, there are always birthstones ..

What I like about this style of bracelet .. a one-of-a-kind special order using stones instead of names .. is that it's so very much more personal and private. Someone could look at this piece and have no idea that each and every stone represents a special little person. There are no doubt some women who would prefer the conversation-starting style of a bracelet with several names on it .. other women know what those names are and are bound to ask. And some women would love nothing more than to relate the glowing and talented natures of each and every name on her bracelet. This design allows for more subtlety .. someone might see it and comment on it; the recipient is then able to either simply express thanks for the comment (a positive comment, I hope) or go on to explain what the stones represent. I like the mystery of it. Some women like to keep a few special things to themselves .. or not. And sometimes it just depends on the moment.

I will admit that 17 birthstones seemed a bit daunting at first; but I think I came up with a design that is not only balanced, but doesn't even seem like it contains 17 stones at first glance. I have a "Modern" list of birthstones posted in my studio, and it's this list that I use when anyone wants to talk about making a piece like this. I made myself nuts hunting up a list I could use .. there are so many different versions. I finally just found one that seemed to contain most of the recognized standards. This particular list contains alternative stones for several months, which turned out to be useful for this design, as I was able to use one of each for months that represented more than one child. The 17 stones used for this piece are as follows:

4 Jan (garnet)
2 Feb (amethyst)
2 Mar (aquamarine)
2 May (emerald)
2 Jun (pearl, moonstone)
1 Sep (sapphire)
2 Oct (opal, pink tourmaline)
1 Nov (topaz, citrine)
1 Dec (blue topaz, turquoise)

The only segments of the bracelet that use sterling silver are the lobster clasp, the wire used to wrap the small dangling briolettes, and the half hard wire I used to connect loose stones to each other or other segments in the bracelet. Everything else .. the CHERISH and heart charms, the large patterned rings, the smaller jump rings, and the ball-end headpins .. are all hand made and work hardened by me from fine silver. I would have liked to have made the entire thing from fine silver, but I couldn't work harden the wire I used to connect segments without mangling it. Even drawing the wire through a draw plate didn't harden it to my satisfaction (not enough to hold up under heavy wear, which these kinds of bracelets tend to get) .. so I compromised a little.

The photo above shows the little heart charm and a fine silver extension chain to which is attached a small fresh water pearl disk, a peach moonstone, and a faceted lemon citrine briolette.

Once I started thinking about it, I was able to come up with a design idea relatively quickly - though it ended up taking me five .. almost six .. months to complete (it was intended either for the recipient's birthday on November 30 - missed that one due to my anal retentive, gotta get it right, attitude - or Christmas). I would lay out some stones, but would keep coming up with new configurations. Then I'd be unhappy with the stone selection I had for the few more precious versions that were included: I had sapphires, emeralds and blue topaz, but they were all very small and wouldn't have stood out as a part of the piece the way I had wanted them to. Fortunately, I found a fabulous new supplier from whom I could purchase precious stones in small quantities (most stones and pearls come on 16" temporarily strung strands .. more spectacularly cut stones or specimens come on 8" strands or are sold by weight). This made all the difference! A full 16" strand of emeralds, sapphires or blue topaz like those used in this piece would have been hundreds of dollars. It took me a while to find all the replacement stones I wanted .. but it was worth the wait.

The pink stone on the left is actually an opal .. not the usual Australian type but rather a pink Peruvian variety (Peru has blue opals, too, but they're much more rare). I did finally find some traditional Australian opals .. but even though the strands were a bit costly, I was so very disappointed in their quality when I received them, I couldn't possibly have used them in this piece. The pale blue stone on top is an aquamarine. Since there were so many garnets, I used the smallest ones I had. They hang on either side of a sapphire on the left and a Swiss blue topaz on the right (and isn't that a pretty stone!?!)

There's the second aquamarine on the left, two beautiful amethysts on the right, and two emeralds and a little pink tourmaline hiding behind them in the center. The large ring from which they dangle is made of fine silver (that's .999, or as close to pure as you can get) and is patterned on both sides. Adding the two patterned rings allowed me to add those smaller stones without taking up any length on the bracelet.

The CHERISH charm was an after thought .. I knew I wanted to add a charm like that somewhere on the piece, but I wasn't sure what I wanted it to say, where I was going to put it, or how big or what shape I wanted it to be.

It wasn't until I began to assemble the pieces that I got a better idea of what I wanted and how it would fit in. I knew what size the bracelet needed to be and had to lose a larger coin-shaped fresh water pearl in order to use the rectangular charm. I ended up putting a smaller coin pearl on the extension chain .. and was thrilled that it ended up balancing well with the little disk-shaped peach moonstone! I love it when it all works out!

I call this one .. what else .. Cherish. Just in time for Christmas, too. Whew!

Friday, October 23, 2009

A little sunshine on this dreary day ..

I don't make nearly enough pieces in gold, but when I do they're nearly always eye catching. Not that my sterling and fine silver pieces aren't eye catching as well, there's just something so sunny and bright about this metal! I call this one Southwest Summer .. it just oozes the colors of sage, adobe and dry heat - with a few fluffy white clouds and a blindingly bright orange ball in the sky.

This burst of color is one of the things I love about lampwork glass beads .. that and the infinite creativity the artisans who make them seem to harbor in their bosoms. It's difficult not to feel a sense of fun in a piece full of lampwork beads!

While I have several pieces that are solid metal, I think I will always include pieces that speak to me of a place or an emotion or a time which can be expressed with color. Some color combinations are like a song .. or a smell .. that invoke a wealth of thoughts or memories. A sort of sensory placeholder that just sort of pops up when the right combo is put in place. These memories or thoughts most often reveal themselves in the names I choose to give my pieces .. some are obvious, others not so much.

This one seems rather obvious, doesn't it? Despite the fact that the design is based on a similar silver version called Twilight .. which used pale blue/violet color- changing lampwork glass beads .. Southwest Summer seems to fit the piece well. And if I hadn't told you of the design similarities, you might never had made the connection.

OK .. I'm off to begin piecing together a commission for a grandmother's bracelet containing natural stones representing 17 grandchildren! While I've got a basic idea of the design features, I've yet to lay out the individual stones and decide what goes where just yet. And I'm thinking I'd like to make as much of it as I can out of fine rather than sterling silver, which will require a bit more care in keeping connecting pieces sturdy. Stay tuned ..