Wednesday, December 12, 2012

With All My Heart Redux


A little over two years ago (August 2010) I made a bold little piece called With All My Heart

The original necklace
This was originally meant to be a one-of-a-kind piece, but in late July of this past year someone left me a comment on this post:

“How do I order this key to my heart jewelry? I am in afghanistan and would love to get it for my girl at home.”


It was actually a few months before I saw the comment. I’m supposed to be able to moderate comments, so they don’t post until I see them, and I should get an email telling me I have comments to moderate. But not this time. Not sure what happened, but I contacted the guy, whose name is Jon, apologized for the delay and asked if he was still interested. As it happened, he was!

“It is beautiful and (we) have that special "Key to my Heart" relationship so this piece is very fitting and she will love it. I wish I could use the key she gave me in a gift but I believe we will gain quite the key collection in time :)”

I had sold the original piece at Mare's Wares Arts Fest in July of 2011, but told him I had all the materials and could make another. So we discussed payment, shipment, delivery, etc. As it was to be a Christmas present, I only just shipped it. But THIS time, I photographed the process along the way.

I don’t know if he’d be interested in the process, but I find myself interested in explaining it. At art shows, which are supposed to be (though aren't always) filled with vendors who hand craft their products, I still get the occasional browser in my booth who'll ask “did you make all this?”, which only serves to make me wanna grab ‘em by the collar, pull ‘em in close, and explain how each and every piece on display is made. OK, maybe not. Well, I might think it, but I would never actually follow through (grin). This piece took me a little longer to complete than it might have because of a few complications, so I thought I’d take a few shots along the way.

Most of the components assembled on a cork board work space.


I assembled everything and put it all together on my work space so I could think about the order in which I needed to proceed. I cut two 19.5" lengths of sterling silver chain for the main part of the necklace and a small 1" piece from which the little puffy heart hangs; I added - and fused - jump rings to the three components that will hang from the pendant; I wire-wrapped the little piece of coral and connected it to the eye pin that then goes through the puffy heart and will attach to the bottom of the short length of chain. I used heavier 16 gauge wire for the hook clasp, 20 gauge wire for the pendant that holds the three components shown, and lighter 22 gauge wire as a finishing touch wrap where the strung segment connects to the chain.

Chain, hook clasp & small components
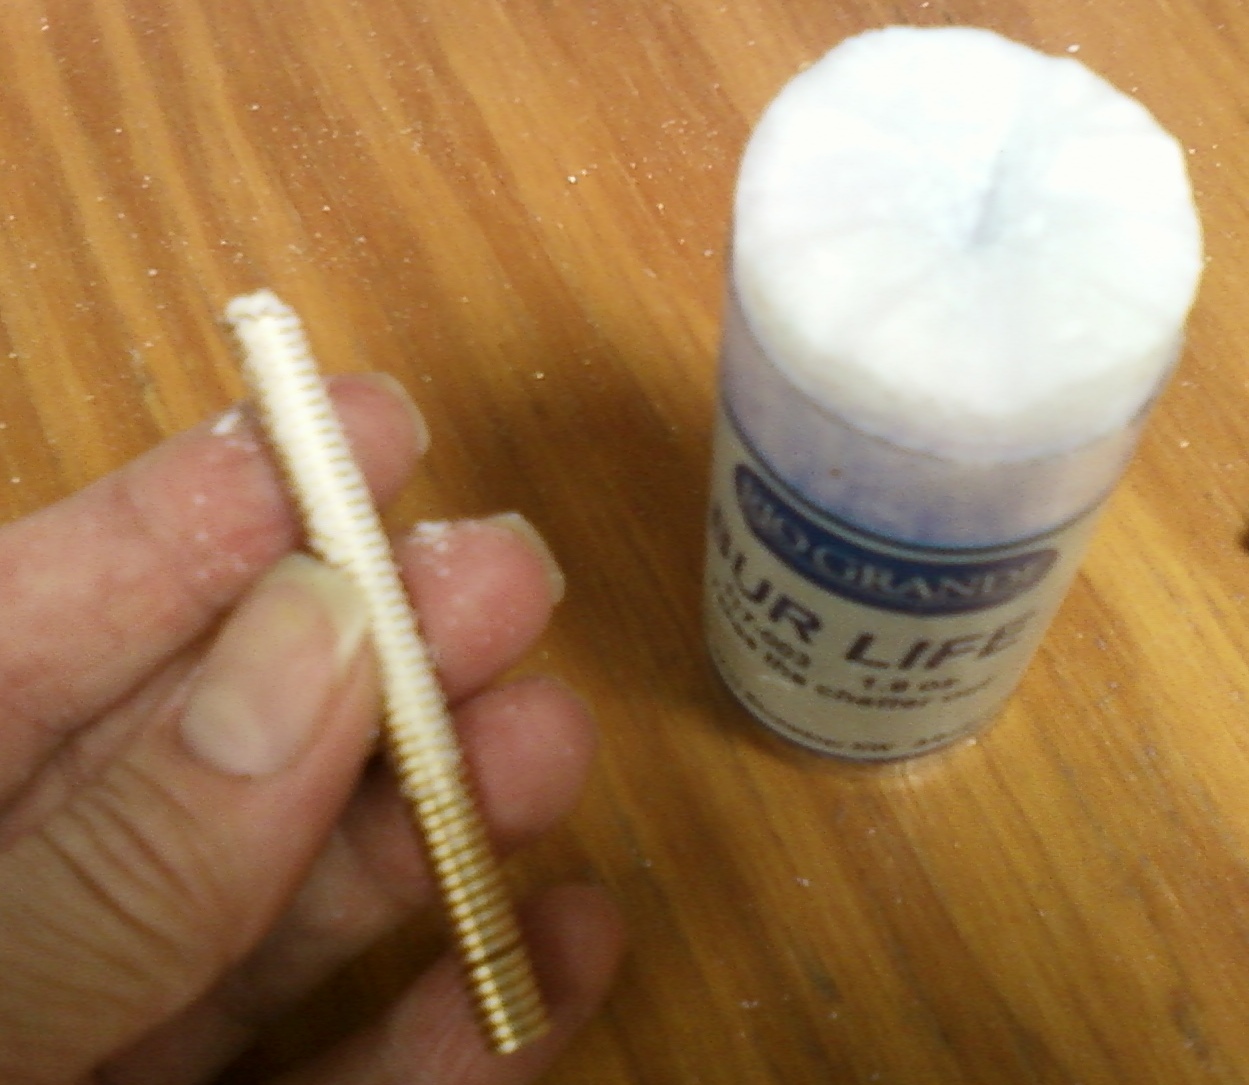
After I had everything assembled, I began patinating individual silver pieces. I never used to like using liver of sulfur. I always preferred bright and shiny silver to artificially blackened pieces. But blackening, and then cleaning, the silver really does add visual interest. And in the case of the De Tout Mon Coeur tag, it was necessary to make the letters really pop and more easy to see.

The letters in the fine silver tag really pop after a dip in LOS!


There are times when I can dip an entire finished piece into warm liver of sulfur, but I didn't want to do that with this piece; I had more control over the components by dipping and cleaning them individually. And the little puffy Thai silver hearts had already been patinated a bit, so I didn't want to have to clean them off again.

Completed pendant, ready to string
In the original piece, I used half hard silver wire for the round pendant piece that holds the three pendant elements; but I couldn't find any of my 20 gauge half hard wire. It's on my reorder list, so it's possible I used it all to make ear wires this summer. Ah well. So, what I had to do was work harden the wire a bit. I just put it on my steel block and worked it over with a small rawhide hammer. This hardens the wire without forging it. Still .. even with half hard wire, this segment of the piece can be mangled, so it should be handled with care when storing and wearing it.

Partially assembled


The portion of the piece connected to the chain is strung on Soft Flex beading wire. This is 49 strands of fine nylon coated stainless steel. It comes in multiple strengths and I used the .024 diameter "heavy" type, because it's a relatively hefty piece and I wanted it to hold up over time. Generally when I use beading wire on a piece, I end it with bead tips, tiny little bead cups with hooks. The cups hold the knot (yes, this stuff can be knotted), and the hook allows the strung piece to be connected to a clasp. On this piece, however, a bead tip wasn't going to work.

Beading wire through a crimp bead
The design was such that I had to use a crimp bead. I really don't like or trust crimp beads. They're tiny little sterling silver tubes through which the beading wire is strung. Then with a special crimping tool, which has two separate crimping stations included on it, the crimp bead is smushed against the wire. The first crimp creates a crease down the middle of the tube making two separate channels .. through which each piece of wire passes. The second crimp brings the two channels together and rounds them out a bit. If you do it right, it should be secure. But even when you do it correctly, it's not always secure .. and somewhere down the line, the thing will release its hold on the wire and your piece will come unstrung. That doesn't happen with bead tips (the hook on the bead tip may open and release the clasp, but the strung piece remains intact, so you don't lose any of your beads).

The 1st crimp creates two channels
But I have used crimp beads like this before and have found ways to reinforce or strengthen them when the design calls for their use, like this one did. It amazes me that even expensive pieces like those you might find in the Sundance Catalog use them (here's a lovely little example that could have been made sturdier with gold-filled bead tips instead of crimp beads). Not only are they untrustworthy, they are a relatively unattractive way to "finish" a piece. Just my humble opinion (and a designer soap box issue, as you might have determined); but if you're going to charge a couple hundred dollars for a piece, as Sundance often does, it should be both attractive and sturdy.  So ...

Almost done!
.. this is what the connections look like once both of the crimp beads have been attached (that little extra piece of beading wire on the right will be tucked into the silver bead). I couldn't possibly, in good conscience, leave it like this. So I dipped a couple pieces of 22 gauge wire in some fresh liver of sulpur and wrapped those areas where the crimp beads and the beading wire meet. This not only adds a nice finishing touch, but it also adds a bit of strength to the beading wire and crimp bead connection. Any favorite piece that's worn and handled a lot can be subject to breakage, but I do whatever I can in the design process to make it more difficult for that happen.

The finished piece!
So, here it is! The necklace proper is around 30 inches or so long, the pendant is an additional 3.75" long. I really love this piece and after I sold the first one in July of 2011, had fully intended to make one for myself. So this one should have been mine (smile). I wore it with various white t-shirts all summer long (though it would probably look just as good against a black one). I truly hope the recipient loves it as much as I do (and did). Lucky girl!

I made some matching earrings, too .. they weren't part of the order, but I had a couple set backs (I had originally promised delivery mid-November) and Jon was so wonderfully patient and understanding that I included them as a concession to his patience.

Plus, if she's not in the mood to wear the larger, bolder piece, she can still wear the earrings and remember both the gift, the giver .. and that she's loved!

It's hard not to love commissions like this!


Monday, September 17, 2012

Byzantine, with a twist

I got crazy and cut a bunch of rings a couple weeks ago with the express purpose of making a few more Byzantine bracelets. However, I wasn't in the mood for the same 'ole thing and created a couple new versions of this popular chain .. with a twist. The bracelet in my previous post included a fabulous clasp I made from fine silver clay. This version uses a combination of sterling and 14k gold-filled rings to complete the chain. And to punch up the sparkle power I added a relatively new cut of Swarovski crystal to this bracelet. I was pleased with the result! I liked this one so much, I made two, slightly different, versions. The one below places the gold-filled rings in the two-by-two position .. the other version has the gold-filled rings in the alternative position (where the sterling rings are in this photo). Though the two bracelets look about the same side-by-side, the second version uses more gold-filled rings and is, therefore, a bit more costly.


I have a tendency when I'm in the studio to just ... go .. with a design. I think of something that I believe will work, pull out all the materials, play around with it for a while, then put it together. Unless the design is something truly complicated, this process usually works well for me. However, it's generally not until after the piece is complete that I write up the material list and cost. As I have recently (and in the past) sold several expensive pieces, I don't worry too much about this. Though many jewelry designers are much more aware than I of what a piece will cost before they assemble it, I find that if I thought about that aspect too much, I'd probably never create anything. My only concession to this "make it first, price it later" type of thinking is my ongoing collection of tools and materials for polymer clay work (a much less costly material with which to begin a piece). Despite having played with a few simple polymer clay designs, I know in my heart that the types of pieces that will live up to my standards (and which I will be proud and happy to display for sale) will most likely take more time to complete than some of my precious metal and stone designs. The types of polymer clay pieces that have caught my eye are complicated little works of art that require some skill, made by artisans who have been working with the medium  long enough to have acquired the necessary skills. So, while I continue to explore some of those skills in the books I've purchased on the topic, I can't help but continue doing what I do. Especially since I still enjoy working with precious metals, stones and pearls.


Despite the high cost of gold and silver, I continue to purchase and work with these materials. They remain a good investment, both for creating and purchasing.  I doubt silver will ever again be at the $4 an ounce price it was when I began this business adventure. And while I don't use quite as much "high gold" as I once did .. 14k, 18k, 22k, etc. .. 14k gold-filled materials are a fine substitute. I often find myself having to explain that an item (like this bracelet) made with 14k gold-filled materials is barely a step down down from a solid 14k gold item (and a huge step up from anything that's plated, which I would never use). Items made with gold filled materials are considered professional jeweler's quality. 14k gold-filled wire is made by forming a tube of solid 14k gold which is then "filled" with a base metal. The gold is bonded to the base metal with heat and pressure. The base metal is also gold in color and is made up of almost the same mixture of metals (usually a brass alloy) used to bring 24k gold down to 18k, 14k, 10k, etc. The exterior of the product is solid 14k gold, and everything you can see or touch is a solid layer of 14k gold. The gold layer on gold-filled wire is approximately 100 times thicker than gold plate - and because it is bonded with heat and pressure, it will never tarnish, chip or wear. While I occasionally still use solid gold materials in my pieces, using 14k gold-filled wire, chain and components allows for designs with the beauty and value of 14k gold at considerably less cost than a solid 14k gold piece.


I would love to make an all-gold version of this bracelet .. but at the current price of gold (hovering just below $1,800 an ounce), even a 14k gold-filled version would be outrageously costly. So .. I compromised a little. I may even have to make one of these closer to my size to go with the one or two other gold and silver pieces I regularly wear. Combo pieces like this bracelet go well with both silver or gold .. though the crystals on this design punch up the overall gold flavor considerably. It's a lovely piece!

Wednesday, August 29, 2012

Zentangles and Jewelry

I can't remember when I first became aware of Zentangles .. though I DO know that it was through one of the many jewelry magazine subscriptions I was receiving. There was an article on the art form which really intrigued me. Anyone can do it, and there are "Tangle" books of all sorts available with designs to try. Though the place to begin is at the Zentangle site http://www.zentangle.com/- click on the little "play" button at the bottom to see a slide show of various designs (or go to their blog link in the upper right corner to see what creative things people are doing with them!)

At the time I was interested in trying to make my own photo sensitive texture plates out of a Zentangle design for use with metal clay, then it occurred to me that getting a rubber stamp made from a Zentangle might be the better way to go. Helen Breil beat me (and probably a whole lot of others) to it. She took the idea and really ran with it. I have to admit, it was much easier to just buy one than to go through the whole process of making a bunch of Zentangle designs, and then send them off to .. where ever .. to be made into rubber stamps. I imagine it would take a whole lot more time and $$ than it did to purchase the five I have. Helen currently has twelve designs. You can see them here: http://www.helenbreil.com/Textures.php. I purchased Mambo, fandango, Conga Line, Tango and Watusi .. though now that I can see some of the newer versions, I may have to buy another one or two!

For the past four years or so I have been stocking up on various tools and materials with the intention of getting into Polymer Clay designing. When the price of silver and gold skyrocketed, it seemed like an interesting medium to play with; especially since I was seeing a lot of impressive jewelry being made with the stuff. I've been collecting books, tools of all kinds, acrylics, silk screen sheets, at least one DVD ... and clay. A whole lotta clay (after doing very well at several recent shows). Helen is a Polymer Clay artist - she's got a website (and a Facebook page) full of some of the fun stuff she's done with her own texture tiles  http://www.helenbreil.com/ .. and I had originally purchased the texture plates for polymer clay. 

However, I ended up using one for the first time a few weeks ago to make a fine silver (precious metal clay) clasp for a new Byzantine bracelet (for which I cut all those rings recently). It was the Mambo texture I used; and I have to say, I was initially concerned that there wasn't enough depth in the texture tile to really allow for a good impression. This is quick photo I took of the Mambo tile (they're all about 4" x 5").


And this is the bracelet and clasp that came out of the experiment! I thought it impressed quite nicely!! The finished bracelet is a little too big for me, which is just as well as I'd be inclined to keep it.


I have a couple of clay stamps I use with metal clay (and will probably use with polymer as well); one is just my business name, the other is my logo. The name seemed more appropriate for this piece.


I thought the finished design, as it appeared on the clasp, looked a little like a Nautilus. So that's what I call it.  It's much more impressive in person (did I mention I'm still getting used to this new camera?!?)  : )  


Tuesday, August 28, 2012

Been a long time comin' ..

So, it's been a while. Lost my enthusiasm there for a bit. Also lost my laptop hard drive and my camera.  Well, maybe "lost" is the wrong word. The laptop was seven or eight years old, the camera at least that or more. Neither owed me anything and the laptop was a workhorse .. and it was time to move on from Win XP. I have since replaced both, the camera just recently though .. and have experienced the frustration of learning to use a new device. You all know what I mean .. it doesn't do what you hoped or what you expect or what you were used to. You get there, of course. But it's time consuming.

I recently wound and cut jump rings for the first time in quite some time. Long enough to have destroyed an expensive cutting blade on my first attempt. Fortunately, I had a back up. I thought it might be fun to record the experience for once. I made the mistake of using my Samsung phone camera rather than a tripod and my new Canon Powershot, however. So please accept my apology for the few (OK, several) out of focus photos. I will have to order more sterling and gold-filled wire before I can give it another go (and that's coming soon); but thought you might like to see the process anyway.

I have a collection of mandrels in different sizes that fit into the chuck of a chargeable drill. The Jump Ringer kit I bought came with a manual winding tool, but the drill is loads faster. However ... one can slice a finger with an errant piece of wire end pretty quick. The green tape is called Alligator Skin, and prevents accidents. I usually put leather "thimbles" on the tips of my fingers and then wrap the tape around them.


I wind all the wire I will be needing first. I try to remember to make the spiral lengths short enough so that there will be room in the cutting trough for the blade. My original Jump Ringer kit came with a shorter cutting block. I purchased separately the one I use in these photos. Otherwise, I would have had to wind the spirals at about half to three-quarters of their existing length.

Before cutting, I liberally cover the area on top of the wire spiral .. the part through which the blade will be cutting .. with a waxy lubricant. Your blade is likely to last a lot longer if you do this (that is if you haven't already destroyed one through thoughtless procedure).


There are four different trough depths on each of the four sides of the cutting block. The wire spiral goes in the center of the trough .. again, so that the blade has room on the front and back end of the trough when you're cutting. The lid with the slit (for the blade) goes on .. the two little thumb screws hold it down.


The spiral should ideally set just a bit above the edge of the trough. The reason I destroyed a blade was that my spiral sat TOO high. Silly girl. At $10/blade, that's a costly error.


This is the blade housing .. it's attached to a flex shaft (I suppose you could use a Dremel, but I'm not certain). The blade is visible in the photo below .. it fits into the slit in the top of the cutting block, and the sides of the housing fit snugly on either side of the cutting block.


One of my more blurry shots .. sorry. When you're assembling the blade and housing on the flex shaft, you want to be sure you have your blade on correctly, so that it cuts in the right direction. Putting it on upside down is another good way to destroy a blade. Had a left handed jewelry maker in the studio once, showing her how to use the device .. after a couple false starts, we ended up purposely putting the blade on wrong, and then moving the Jump Ringer housing from left to right instead of right to left. It's a wonder we didn't strip the blade of all its teeth in the process!!


When you remove the cover after cutting, your spiral is now a bunch of independent rings. Yay!


I run a piece of copper wire through them while they're still a little bit stuck together by the Bur Life, twist the two pieces of wire together to make a little teardrop shape, and drop a bunch of these little bundles into the tumbler with a little Dawn dishwashing liquid and water. I leave them to tumble for anywhere from 30 minutes or so to a few hours (sometimes I just forget!). The tumbling not only cleans off the waxy lubricant, it also shines up the rings and work hardens them a little bit. Just a little bit. But every little bit helps .. depending on what you intend to do with them.


I did manage to get a few shots of the two items I ended up making with my new jump rings, and I promise I'll post those next. I even used the Canon .. though with a whole lotta frustration involved. I mean shouldn't macro mean close-up? Then why all the blur when you move in close. I'm thinking I might have to actually look at the manual! But .. I did get enough photos to post and will do that soon!


Friday, March 4, 2011

Ch ch ch ch changes ...


Maybe it's just that my brain is wired in a strange way, but when I get a commission to create a special piece, it almost always starts out in my mind one way and inevitably ends up being something entirely different when it's completed. Perhaps this creative process is common in those who do this kind of thing; all I know is that it's a fun, stressful, creative and frustrating adventure every time .. and I love it. Especially since the end product is usually as much of a surprise to me as it is to the recipient!

This Remembrance Anklet began as a request by a friend of mine on behalf of five women (the five named on the tags) who wanted a special retirement gift for a friend of theirs. The recipient wanted an anklet - I don't make many these days, because they just don't sell much up here, but got the measurements and started thinking about how to go about it.

The spokesperson for the group and I went back and forth regarding using initials, versus entire first names, and whether or not to add crystals or stones to indicate birthdays for each of the five and to create a little sparkle in the piece. I also toyed with different clasps .. a commercial clasp vs a handcrafted item. I decided I could do complete first names; but putting five name tags on a length of chain (even ten inches of chain) is going to take up most of the space. So I had initially looked in all my various supplier catalogs for existing blank sterling tags of a particular size and shape with pre-punched holes on either side. The longest name was six letters, so I needed something long and narrow, yet high enough for the letter punches I have in the studio.

I wasted a lot of time in that process .. most of the blanks I found were round, square, too big, too small, not pre-punched, etc. I knew I wanted a sort of elongated oval .. that was my ideal; and perhaps there's a source out there somewhere that sells exactly what I was looking for, but none of my usual sources had anything like it. So the sterling chain and charm piece I had originally planned on wasn't going to work. There was nothing for it but to create the thing from scratch. I have some sterling sheet and could have cut out five ovals and punched them all in the appropriate places before adding the individual letters. But as I had some PMC3 on hand .. the strongest of the three silver metal clays .. I decided to make the thing entirely out of fine silver. An added benefit of using PMC3 is that the initial letter size would end up being about 10% to 15% smaller when they all came out of the kiln (which wouldn't have been the case if I'd stamped directly onto sterling silver blanks).

Well, the decision wasn't exactly a mistake, because I loved the finished piece, but geeeeeeez! Can't tell you how many times I rolled and re-rolled a piece of clay because I didn't get the letters P E R F E C T. I finally decided that as this was a handcrafted piece, the natural flaws in the piece were indicative of the "handcrafted" process and were to be enjoyed as part of the love and attention that went into the giving of the gift and the making of the gift. Not your machine-made piece of perfection, but a solid piece of backbreaking work (believe me, all that micro sanding of each and every little name tag charm was indeed back breaking ). And I won't even mention the trouble I had with the kiln .. oy!

After I had all the charms cleaned up, fired, tumbled, work hardened, and then dapped to create a slight curve, I wound and cut a length of fine silver wire into all the rings used to connect the pieces and create the additional chain needed to bring the length out to what was needed (plus a little more, just in case). For just a moment .. and a moment only .. I thought about adding the "birthday crystals" to dangle prettily at the end. But it wouldn't do .. it was no longer the kind of design that would support crystals aesthetically. So, what I used were small Thai silver beads .. which are also fine silver. They're a lot sturdier than the crystals would have been .. and they meld into the design so much better. As the rings in the chain were large enough, I was able to create a long, narrow hook clasp that I'm certain will prove to be secure and which could hook into any of the rings along the length for a perfect fit. Once all the rings were fused, I went down the entire length of the chain and tapped around each and every ring on an anvil to work harden them for strength. And after all THAT, I dipped the entire piece into a dish of liver of sulphur to blacken it .. I mean really blacken it. Then I systematically went over the entire piece with steel wool to clean up most of the blackening, but allow the letters to "pop" on the name tags. The final touch (like adding the title page to a paper you've slaved over for weeks!) was tapping my business name into the back of one of the tags.

I hope the recipient was as truly happy with the end result as I was .. not having sold it directly to her, I only have the word of my go-between (which was positively glowing ). It's always great to sell a piece I've made .. but these particular kinds of sales never fail to make me feel like I've really accomplished something. The emotions attached to it are a little more intense and personal, and that just makes it all so much more worthwhile.


Friday, August 13, 2010

With all my heart

I honestly believe that necessity is the mother of invention. There are books (and websites) full of this kind of "positive attitude overcomes adversity" type quotes and phrases .. heady things like Nietzsche's "What doesn't kill me makes me stronger" as well as lighter fare, "When given lemons, make lemonade" .. and the more poetic "Sweet are the uses of adversity, Which, like the toad, ugly and venomous, Wears yet a precious jewel in his head .." by Shakespeare. I love that. It really gets to the heart of the matter. Sometimes there is a silver lining. And sometimes things happen for a reason .. whether or not one can work with that is up to the individual. Easy enough to feel sorry for yourself. I tried not to do that, but when you can't work (and I really couldn't at first), it's a bit depressing. Spent a lot of time and money looking for a "quick fix" .. chiropractic, physical therapy .. acupuncture.

All of which helped a little; but my all-encompassing issue has always been chronic yeast and I think I knew down deep that it was feeding the inflammation and I'd have to do something drastic dietwise before my wrist would begin to heal. So, I finally got down to it about six weeks ago. While strictly monitoring my diet in an effort to beat out the yeasty beasties and ever so slowly repair my painful wrist, I've had to rethink my jewelry designs. Things improved dramatically after I went on a modified allergy elimination diet .. and I continue to be able to do things around the house and in the studio that I couldn't back in May and June .. but it's still not quite 100% yet. There are more than a few designs in my inventory (or long gone) that were real wrist-wrenchers in their creation. I'm aching - so to speak - to get back to the elaborate and time-intensive chain maille and wire wrapped bangle designs that leave me feeling so incredible satisfied when a piece is completed! However, while I attempt to keep from doing any more harm to my wrist while I continue to pump up my inventory, I've necessarily had to change course a bit. Stringing was the least painful thing I could do, but, you know .. been there, done that. And there are more beaders out there than ants in an anthill. If the right design comes to mind, I will still occasionally toss in a beaded design (and there are some old beaded design favorites that continue to do well) .. but I'm all about new and different. I like learning and trying new things.


So .. went in a just a slightly different direction with a new line of Talisman necklaces (bracelets may be forthcoming, we'll see). I'm not one to believe in things you can't see, but I do believe - as I've already explained - in attitude adjustment. And sometimes we need to be reminded that "every little ting will be ahright" .. that we hold the key to our happiness. It was this "key to happiness" thing that had the lightbulb shining over my head this time. I bought a bag full of old skeleton keys from an antique dealer when the whole Steampunk fad emerged as the "new thing". I wasn't sure exactly what I was going to do with them, but I'd also purchased a bunch of old watch parts (and got a bag full of old watches, too) in a casual search for Steampunky components. I'd had visions of resin-encased bits-n-pieces pendants, but am still experimenting with clear resin .. and wanted to stay away from chemical fumes while I continue to heal. One day I was just messing around with some fine silver fun phrase tags I'd made .. affirmations, declarations, cliche things .. and came up with this lavish piece I call "With all my heart" (inscibed in french on the little fine silver tag). It just kind of took off from there.


I haven't yet photographed them but I've also created "Sea Change" and "Live Juicy" (a recommendation made popular by the colorful and ever-positive Sark). And I have additional tags awaiting their own necklaces for "Je ne sais quoi", Jois de vivre", "one day at a time", "this too shall pass", "In vino veritas", and one about an acorn that I'm still working on. I had toyed with calling them Affirmation necklaces .. but "Talisman" had a better feel. One of the definitons I found was, "anything whose presence exercises a remarkable or powerful influence on human feelings or actions." That was closer to what I was trying to do when I thought about the idea behind the pieces.

These jingly and sometimes musical little pieces make me happy .. I've tried to make each of the three I've created so far different in design from each other, but this, the first, is really glorious! It's got almost three feet of patinated sterling chain; bright, bold coral; and a little puffy Thai silver heart. It's long and substantial, yet when I wore it around last weekend for a test-drive, I forgot I was wearing it .. well, until someone mentioned it. Which happened a lot. This is one of those pieces I may have to keep.

I'll try to get the others up soon, but things are a little crazy at the moment .. I have a two-day show this weekend here in Ogdensburg. A 2nd "annual" Wine, Beer & Food Festival .. for some unfathomable reason split between two locations: the Lockwood Arena over on the corner of Main and New York Avenue and The Dobisky Visitor's Center down by the water. I'll be in the Dobisky Center with a bunch of other artisans .. the better of the two locations, I'm thinking. Especially since that's where all the beer, Bar-B-Que and entertainment will be. Saturday 11:00 to 6:00, Sunday Noon to 5:00 .. stop over if you're in the area! It's supposed to be an absolutely gorgeous weekend!

(Thanks to Heather Wynn for the design idea!)

Sunday, June 20, 2010

Still Spinnin'


I've been doing a whole lot less stringing over the last year or so, mostly because I've been having fun with wire and metal clay, among other things. But I've had to put my beading cap back on and come up with some designs that put less strain on my wrist as it seems, after almost five months, that I'm still dealing with some pain and discomfort. For a while I couldn't even make a simple wrapped loop on an earring. That isn't the case any longer, but working with anything thicker than 18 gauge (dead soft) wire has me reaching for the Ibuprofen before bedtime. I feel a little improvement now and again, when I realize I can do something I couldn't do even a couple weeks ago without pain, but it's been very slow. I have every confidence that I'll get to the other side of this, but while I'm waiting I have to think about the few shows I have coming up. So .. I rummaged through my collection of materials this week and found a whole box of Czech glass seed beads!

There are any number of secreted, forgotten surprises down in my studio .. boxes, bags and baskets full of stuff stashed away for later use. You know how it is .. if it isn't out where you can see it, you tend to forget it's there. Most of the seed beads I have are 6/0 size .. a bit larger than what I wanted for a multi-strand necklace that began materializing in my head. I needed something that would allow three or four strands to fit nicely into the sterling Bali cones I also found while rummaging. These matte black beads were perfect for the job! (There are some other colors I found to play around with as well .. this one just worked with the color scheme I needed at the moment).

The little pale green beads are chrysophrase, a real pretty stone that often looks like it's illuminated from within. They're interspersed with 4mm sterling silver round beads.

The cones that capture the strands at the clasp are absolutely gorgeous examples of granulation. These were hand made (not cast) by artisans in Indonesia .. each one of those little dots is applied one at a time. You should be able to click on any of this photos and see the piece close up.

The toggle clasp is also an Indonesian hand made component. You can usually tell the difference between truly hand made Bali components and those that are more cheaply cast by the way they look upon closer examination. "Bali Style" components which are cast look sort of like they were partially melted in the sun. Because the silver is poured into a mold instead of created from scratch, the individual design features lack the sharp detail of individually placed design segments - they run into each other instead.

The pendant is turquoise and is hinged in the center .. it's also removable, so you can wear the strands without the pendant, if you choose. The first thing I thought of when I put all the colors together was a panther .. you know, black as night .. with green eyes? But I couldn't name it "Black Panther" without thinking about the 60's and the negative connotations .. so I called it "Jungle Cat" instead.

It's currently in a beautiful Arts & Crafts oak display case at Mare's Wares Pottery on Route 37 in Morristown .. the site of an upcoming show on July 1st. Look for more information about the show at either www.artisansoftherivervalley.com or on Facebook at "Mare's Wares Arts Fest". If you're in the area, stop over .. it's going to be an incredible day!